
 by
by Peter Robbins, 16 February 2026
Wargame Design Studio are back with the next installment of their Sword & Siege: Crusades series. How does Book II hold up compared to its predecessor? Let’s take a first look.

What’s In The Box?!
There are over 100 provided scenarios, several of which are Crusades Book II specific training missions, and of course the proverbial Getting Started scenario, which aligns with the Getting Started PDF. I absolutely love the fact that they are going past their normal Getting Started walk throughs and including Sword & Siege specific training scenarios. This is a really nice touch and very happy as a user to see them included. It just extends the player a bit past the ‘getting started’ level of information and more into “feature” specific training.
Beyond those additional scenarios, you get into RTFM territory, which is of course what you ultimately WANT and need to do, but you can dive right into the game without reading the full manual. Always the sign of an intuitive game when you can get away with at least trying out everything without reading 100+ pages of a manual. But, read it : ) all said and done.
The Change Log that comes with the new game explains rather succinctly what is new in the initial release of Crusades: Book II, game engine; version 4.03 as it is called. I have it on good authority (Rich with WDS) that everything found in this change log will be mapped back to Book I (eventually, give them a little time).
That is the beauty of purchasing WDS games. You know that more often than not, if there are subsequent improvements to the series engine, those will eventually be mapped back into the constituent games of the same series. Not many companies do this.

click images to enlarge

The above scenario list shows a prolific amount of battles included in this second offering in the Sword & Siege Crusades series of WDS wargames. It hasn’t even been that long since BOOK I was originally released; so I’m utterly amazed at how much content they’ve managed to get together for this new title. None of it feels thrown together either.
One of my first impressions for Book II, is holy gravy, the 3d is creeping ahead of the 2d implementation now! I knew we’d eventually get here (just with the leaps and bounds over all of the WDS series of late), but it’s so nice to see we are at the tipping point. The 3d engine and the overall map presentation is really crisp down low in this game.
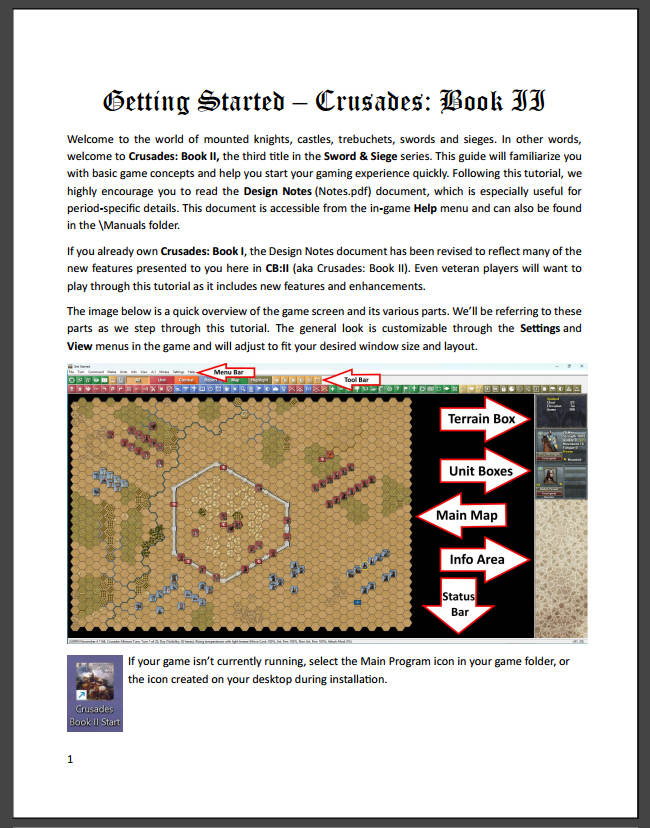
The screenshot below is from the Getting Started scenario. The 3d sprites now have a bit more of a third dimension to them visually. They just “pop” a good bit more visually. It’s a nice step forward for the engine.The terrain across the board I think may be using some of the newer 3D engine code they appropriated and recently showed off some Falklands Squad Battles prototypes for (see:this WDS article on their appropriated terrain engine from the makers of Burden Of Command)
Note: Most of my included screenshots will include In-Screen comments! So be sure to maximize the images to see all of my commentary throughout this article.

Game Specifications
|
Sidebar
Per the Getting Started guide “A turn in CB:II represents 10 minutes of real time, and a hex covers 40 meters across.” This is a bit smaller scale than most of the scenarios in Book I. That is a significant difference for this offering vs Book I. Additionally of note from the Getting Started guide: “A breach can be defined in several ways. 1) a section of wall is turned into rubble, 2) a gate is captured (there are 4 gates to this scenario’s city), 3) capture a wall section via the use of your siege tower and finally, 4) capture a wall section by infantry troops using a ladder.” The ladder is a newer game mechanism introduced in Book II (as seen in the Change Log). |
We’ll dive a bit into two of the more historically important battles depicted in Crusades: Book II
- Siege Of Jerusalem (1187) <- Yes, the end battle depicted in Kingdom Of Heaven (Director’s Cut!)
- Siege Of Constantinople (1203)
This will give us a solid Siege Defense and Siege Attack example to show off the Mechanics & Gameplay of the game series.
Note: For both of these sample scenarios I’ll be using the Default rules, and the Default turn structure which includes a distinct Melee Phase. Most folks do not mess with either of these settings until after they master the defaults.
Typical Siege Defense
Siege Of Jerusalem (1187)

As the Crusaders, you are defending the Holiest Of Holy Cities, Jerusalem, with Balian of Ibelin in command. Yes, that Balian. But he was not a blacksmith. Doh!
For a typical turn during a Siege Defense; below is a simple checklist to follow as a player. I always find, especially for more battle/operation size wargames, that I need to reinforce a checklist of command choices and triggered decisions to allow myself comfort in clicking the End Turn button. I always hesitate in some of these games as I just don’t feel like I’ve checked everything I should. So I approached this article from the vantage point of writing a general Player’s Guide for Defense & Attack in Crusades: Book II.
Siege Defense Turn Checklist
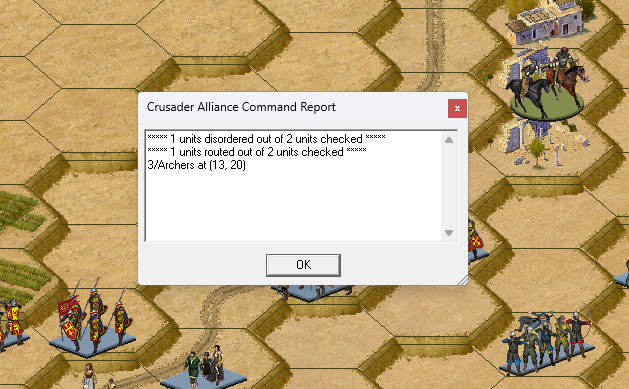
- Read the Command Report
Check how many units have routed, how many have recovered, reinforcements, withdrawals. The turn report comes up in a pop-up just as the enemy’s Melee Phase finishes. Be sure not to ignore it as units out of supply are also mentioned. Note: I wish there was a way to re-pull this up. So don’t forget to take a screenshot of it when it comes up for later re-looking it over if necessary.
- Check Victory Conditions
Take the time every few turns to check on how you are doing as far as losses, kills, and objective points. You don’t need to overly fixate on this. Don’t lose sight of your “intent” overall. (Menu: Info / Victory)

- Check the Current Weather/Visibility
On the line of information at the bottom of the screen, you will see the weather and visibility alongside the time, year, and date. A new feature for Book II is Night Shading, which is available in Settings / Night shading (on by default) which helps you visualize when your troops likely have much worse spotting distance.


Example of Night Shading active. Also, shows off the Info / Organization Dialog.

Here is an additional Night Shading closeup, before Dawn at Battle Of Inab.
- Open PDT (F2) To Check Scenario Game Parameters
The “PDT” is available by hitting F2. It shows you the basics of how the current scenario is set up for all of the important factors used in movement and combat throughout turn execution. Here is sample data from the Siege Of Jerusalem scenario.

- Wall Coverage Survey
Check for empty walls. Make sure towers are occupied. Check that gates are occupied, check for any thinning spots in the defense. You can not be everywhere at once, so keep lines of defense and reserve and make sure they are not blocked from rapid movement on the interior town roadways. - Wall Stacking Limit Check
Check the strength of units on the wall hexes. Check the unit types involved. See Section 4.1.4.6 of the User Manual which mentions the default wall limit of 75 soldiers. If you have over-stacked walls, those units that overlap the limits are not being used effectively. Move them elsewhere where they may be needed more.
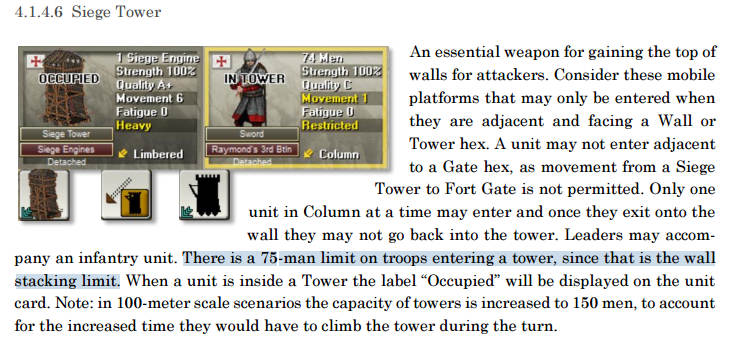
In this particular scenario, the PDT shows the following stacking limits:
Stacking Parameters
|
|
- Gate & Tower Priority Audit
A reasonable rule of thumb is to always have one strong, non-fatigued, non-disrupted unit on your tower walls. Have one defense unit adjacent to it, and then have at least one to two units in reserve in a reserve line a couple hexes to the interior of the town, waiting to rotate in where needed. - Enter Fire Mode and run the “N-key sweep”
Go into fire mode and then press N repeatedly in order to cycle through units that can fire. - Identify “Kill Zones” and “Dead Zones”
Use the Spotting icon filter and then click along each unit that occupies your wall hexes. As you click through, flip back and forth looking for any lack of overlap of spotting line of sight. If you have any dead zones, fill the gaps if you can.


- Ammo & Supply Awareness
Many units in Crusades Book II have limited supplies. In particular war machines. Fire them only when you know you will have a superior effect. In other words, if ammo is very limited, wait until they are closer to you to fire, to get the most potential effect out of the firing. We already mentioned as a checklist item above to always check the Command Reports for when any units go out of supply. Rectify that situation as quickly as possible in order to maintain effective firing in defense. - Build a Reserve Structure (“Fire Brigade”)
Maintain a healthy immediate (on hand in 1-2 turns) reserve, and if possible a deep reserve that is protecting your interior objective hexes. - Interior Movement Lanes
Make sure your interior roadways are not blocked by stacks, keep lanes clear. Especially important is keeping your units in supply as they move beyond the breach. - Leader Positioning Check (Command Radius)
Use the “q” hotkey to highlight the selected unit’s Org and then use the “c command radius view to make sure that all of your org units are within that range. The leader should be behind the wall line, near the reserve line and not exposed on the wall line. - Check Enemy Ladder Placement & Wall Contact
Keep an eye out for enemy infantry next to wall hexes, with ladders visibly deployed. Also be on the lookout for visible wall damage or damaged gates. - Rotate Wall Units (Fatigue/Disorder rotation)
If wall units are fatigued, disordered, or low strength try your best to rotate them off for fresh troops. - Retreat Plan (Fallback Positions)
Try and set in stone in your mind trigger points for when and where to fall back to. Which inner hexes are you setting aside as a potential last stand? - Run the Movement Sweep (N key in movement mode)
Switch to Move mode, and keep hitting the “n” key, thinking have I forgotten any reserves? Supply movements? Did we leave any ladders behind by accident? - Check Routed / Disordered / Isolated Units
Get routed units out of the way of any lanes of movement for fresh troops to use to get up front where needed. Make sure that Disordered units are not holding any key gates. Make sure that any isolated units are unduly forgotten. - Save Often
This helps for the inevitable misclick. Save after each successful set of moves or actions. It’s that ONE move that you cannot undo (with fog of war on, you can not use the UNDO button*) that may mean life or death, literally.
Typical Siege Attack
Siege Of Constantinople (1203)

Several approach avenue issues make this scenario very difficult to master as the attacking Crusaders.
Siege Attack Turn Checklist
- Read the Command Report
Same as for Defense - Check Victory Conditions
ibid. - Check Weather/Visibility
ibid. - Identify Siege Tools
We’ll take a moment to interject a full listing of all of the siege engines available in the game from the User Manual. These are the goodies that we all know and love from this era. I felt like it was worth showing off what sets the Siege & Sword series a bit apart from the Musket & Pike (some overlap still occurs).
Slideshow of the siege engines
…. And finally, Ladders! I’ve never been so excited to see a ladder in my life. WDS made them embedded as a quality for the unit, which is a nice way to approach adding this functionality to the series. Look for the “Has Ladder” marker on the unit counter.

An in-game look at a ladder equipped units is below.

- Setup/Deployment Cycle
Siege engines can take up to three turns (each are 10 minutes in game-time) to deploy and be available to fire. - Traffic Management: Clear Approach Lanes
Keep your ingress roads clear for engines and supply. Keep your assault columns unblocked, and set cavalry in a place that does not clog up infantry moves. - Decide: Breach vs Escalade vs Gate Assault
You need to decide at some point early in the siege whether you wish to breach the enemy’s wall, scale the walls with ladders, or perform a gate assault(with ram and/or tower). - Select Main Assault Sector
While aligning your plan to one main sector for where the main breach will occur, you should also plan for a secondary feint sector, and a reserve/rally sector. - Fire Priority Checklist
Priority should be firing on defender siege engines, tower/gate defenders, wall hex defenders near breach, reserves behind walls when possible. All as close to the planned breach as possible. - Monitor Disorder and Fatigue
Same as in the Defense checklist. - Check Formations For Assault
Most assaults require column approach, line deployment when “near” the wall, and cavalry held back for later exploiting breaches. - Ladder Deployment / Ram Deployment Checks
Check that your Ladder equipped units have MP left to exploit the move to the wall. - Establish a “breach exploitation reserve”
Once the wall falls down, you need fresh troops to pour in. Are you ready to support that need? - Assault Timing Decision
Should you hold off assault this turn and continue to bombard? Are you truly ready to go ‘all in’ for the assault? - Assault Sequencing
You will want to assault the weakest wall hex first, then expand the breach sideways, pushing fresh troops inside once that is completed. - Secure The Breach
You’ll want to occupy adjacent wall hexes, clear towers where possible, and if able, open gate access for your allies to be able to further exploit. - Manage congestion
Once inside the town, stacking limits and blocked movement can be a brutal combination for attackers. - N-key sweep in Movement mode
Had you moved all of your siege engines, supply wagons, assault columns, and reserve units? Same as in the Defense Checklist. Stay in Move Mode, and keep clicking the “n” hot key to switch to any unit that has MP and is eligible to still move. - N-key sweep in Fire mode
A quick check of whether you’ve fired all siege engines and archers. While in Fire Mode just keep clicking the “n” hot key to find any units still eligible to fire this turn. - Confirm assault units are not stranded
Keep leaders, supply wagons, and units without fatigue or disorder nearby to exploit success.
Campaigns
Below is the sample for the The Third Crusade: Levant campaign flow to its first decision point in the cp_start.exe interface. This is sometimes overlooked by newer WDS players. Every WDS game comes with a campaign or several of them. It’s a great way to play the game once you sink your teeth into the Getting Started and maybe at least one or two additional single player scenarios all the way through to success or defeat. It’s ok to lose. I do it all the time.


The above shows you the various “variant” battles that Crusades : Book II provides, but in much better context overall than just picking them willy-nilly out of the scenario listings.
So, my suggested order of play for a noob to Crusades Book II would be:
- Getting Started
- One Siege Defense
- One Siege Attack
- One Full Campaign
- Then scenarios of choice


Gallery Of Shots
Runs as a slideshow
First Impressions & Final Thoughts
Background Sounds are great (as per Book I). The music remains outstanding. The low down graphics are much improved. I put them on par or better now than the 2D zoom levels. That was a surprise honestly. I can tell they are slowly leaning into the Burden Of Command code they recently acquired for helping to spruce up the down low graphics. It shows! But it also blends well even with improved sprites. You couldn’t have one with the other, and they took their time here balancing out the visuals quite well. This game is outstanding, and when you pick this up, you might as well go back and get Book I as it’s an incredible complete set so far covering the majority of the first Four Crusades. The game includes multiplayer by way of traditional PBEM file exchanges. The game also includes several editors: one for sub-map creation (any map can be split up into smaller maps), scenario editor, and a campaign editor. Bravo WDS on yet another hit on your hands. Get it. It’s good.
Appendix A
Military Planning Questions For Your Wargaming Needs
The below is a recent set of questions that I think work very well for hobbyist wargamers to heighten their experience without making it feel like a chore.
Here is a Simple Wargaming Planning Guide. Use File/Download As to create a PDF for local use.
Thank you for visiting the Regiment of Strategy Gaming and riding with The Armchair Dragoons.
Rather than list a bunch of social media links, the easiest thing to do is to check out our LinkTree, which connects you to all of our various locales around the web.
You can also support The Armchair Dragoons through our Patreon, and find us at a variety of conventions and other events.
Feel free to talk back to us either in our discussion forum, or in the comments below.


