
 by
by Peter Robbins, 1 October 2025
A bit of an overview here to start things off. I am going to come right out of the race blocks and say, this is one of the better DLCs I’ve reviewed in the past few years. The price point is good. The content is extremely well researched, and the effort put into each campaign shows through in spades. That is the holy trifecta of a very well put together DLC. This DLC was not just thrown together as a money grab. Some love was put into this. This extension to the already solid core game contains six full campaigns (almost doubling the initial offering), each of varying area of operations scope and time-scale. That successful result alone is something to stop and ponder. Not many wargames can handle this level of re-scaling and still feel like you are “at home” in any one of those scales. The closest that comes to a similar feeling is of course the WDS wargames of late that I’ve reviewed for the Armchair Dragoons community. Maybe Operational Art Of War IV also comes close to this ability of re-scaling as well.
For what is otherwise a “simple but detailed” strategic wargame (I’d generally place it at a difficulty of 4 out of 10), there is a subtle complexity that seeps through, even with its simple interface and turn executions. Think, one complexity level under Warplan Pacific1, with the intuitive / simple approach of even Panzer General / Panzer Corps / Order Of Battle series. All of which you should own. Own all the games. Games unlimited. Never have less games than you can possibly play in your lifetime. LOL
What I also like about Rise and Fall is even though its title implies it is primarily focused on Japan, each campaign is designed with flipping sides between the six campaigns. They are all very enjoyable to play as either side, but each one flips focus. So you end up with three focused generally on playing as Japan and the other three generally focused on playing as the Allies. This is not just a Japanese focused affair.
TL;DR
- Affordable
- Well-Researched
- Well-Executed
- Eminently Playable At Any Scale

click images to enlarge
About This Content2
Series: Strategic Command
Title: WW: War In The Pacific – Rise and Fall Of An Empire DLC
Publisher: Matrix Games
Developer: Fury Games
Scale: Strategic WW2 Pacific (Pre War ’37 through What-if ‘46 Mainland Invasion of Japan)
Price: $14.99 retail (Upon release it was offered at 10% less!)
Immerse yourself in the dramatic saga of Japan’s rise and ultimate decline in East Asia with Strategic Command: Rise and Fall of an Empire. This thrilling expansion delivers six meticulously designed campaigns that capture the intensity and complexity of warfare from 1937 to 1946. From the opening shots at the Marco Polo Bridge to the colossal planned invasions of Japan’s home islands, every decision you make will shape the course of history. Will you lead Japan to unstoppable dominance, or will the Allies crush your ambitions? The fate of empires is in your hands.
Unfolding Campaigns – Experience Pivotal Moments in History
- 1937: Marco Polo to Pearl Harbor – Command Japan’s forces as they march into East Asia, starting with the infamous Marco Polo Bridge Incident. Engage in the Second Sino-Japanese War and witness the mounting resistance of Chinese forces as you push toward global conflict. Can you rewrite history and dominate East Asia before the attack on Pearl Harbor?
- 1942: Summer of Decision – The Empire of Japan stands at a crossroads. Having won across Malaya, the Philippines, and the Dutch East Indies, the time has come to choose your next move. Will you invade Australia, advance into India, reinforce China, or strike Midway and set your sights on Hawaii? Every decision brings immense risks and unparalleled rewards.
- 1944: Imphal-Kohima – March 1944, Japanese forces prepare a daring offensive against General Slim’s Fourteenth Army from the dense jungles of Burma and into India. At the same time, Allied elite units like the Chindits and Merrill’s Marauders are planning offensives into north-east Burma to reopen a land route to China. Will you break through into India, or will Allied resolve thwart your ambitions?
- 1945: Okinawa – Experience one of the fiercest battles of the Pacific War. As US Marines land on the heavily fortified island of Okinawa, the fight becomes desperate and brutal. Defend against relentless Allied advances with Kamikaze attacks, commando raids, and the legendary battleship Yamato’s final sortie.
- 1945: Operation Olympic – Allied forces launch their assault on Kyushu, Japan’s southern home island. The Allies seek to establish airbases for the final assault on Japan, but formidable Japanese defenses and waves of Kamikaze attacks promise to make this battle a nightmare. Will Kyushu fall, or will the invaders be driven into the sea?
- 1946: Operation Coronet – The ultimate showdown approaches as Allied forces from the US, UK, Australia, and Canada prepare to invade Honshu and capture Tokyo. Japan’s desperate defense, bolstered by civilian resistance, could turn this into a prolonged and bloody campaign. Can the Allies crush Japan’s spirit, or will the empire endure against all odds?
Gameplay Features
- Six Epic Campaigns: Relive history with six detailed and dynamic campaigns spanning Japan’s rise and fall from 1937 to 1946, offering countless hours of strategic gameplay.
- Deep Strategic Choices: Shape the conflict through vital decisions. Manage diplomacy, control resources, and decide the fate of nations.
- Enhanced Asian Theater: Explore previously unseen regions of Asia and the Pacific with expanded maps and new strategic opportunities.
- Autonomous Chinese Provinces: Navigate the fragmented political landscape of China, where regional leaders balance their own ambitions with national survival.
- Historical Leaders with Unique Traits: Command legendary figures like Pai Chung-hsi, Yan Xishan, and Wang Jingwei, each bringing their own strengths, ambitions, and agendas to the battlefield.
- Allied Final Drive Events: Coordinate the massive Allied push into Japan with strategic redeployments, logistical challenges, and decisive choices that shape the endgame.
- Japanese Counterattack Events: Witness Japan’s final, desperate measures with daring commando raids, massive Kamikaze strikes, and the last stand of its Super Battleships.
Campaign Situation Analyses
Let’s take a short bit of time to apply what we like to call BrantDMP™ to each of the campaigns offered in this DLC. BrantDMP™ is a very light version of the U.S. Army’s MDMP or Military Decision Making Process that our very own editor-in-chief Brant Guillory came up with3. I’d asked Brant for his opinion on what are the most transposable aspects of the real world process of military planning. I asked him to provide a set of planning questions that are quick to answer, simple to assess, and easy to apply by hobbyist wargamers towards their success in any game.
 |
Side-bar: A major litmus to rating game fidelity is whether some form of “military plan” can be played out in that board, miniatures, or computerized wargame.You’ll see from the analysis below that this wargame, while simple in interface and execution, still allows for basic military planning to be applied. If you take the time as a wargamer to study the full MDMP, and then find and apply simpler compressed sets of questions that encapsulate that structured planning process, you will absolutely not only enjoy your wargames more, but you may actually get better results! |
BrantDMP™ Explained
Disclaimer: BrantDMP™ is not affiliated in any way with the US Army. In fact they want to disavow all knowledge that Brant served with them. I kid! I kid!
So lets try to lightly apply the above to each of the campaigns in this DLC. I think it will not only be fun and interesting, but will highlight the game’s best qualities and what is included in the DLC content along the way.
1937: Marco Polo to Pearl Harbor

Ok, stop. Read the Guide before playing. It’s well written, and a very solid overview of what you are about to face as Japan. You get at the guide in the game interface by clicking on the [?] question mark top right of the main view, then click on the second image from bottom, which points at the “Guide” for the campaign you are playing. If you also want to review the user manual, there is a link for that just above, which is a book looking icon.

Commander’s Intent
In the IT business world, as well as the wargaming hobby world I live in, there is one simple truth: You cannot measure success without clearly knowing where you are and where you want to end up. You also need to have the proper resources and information at hand to accomplish that goal in a timely manner. Rinse, repeat, work and life success. There I helped your life out immeasurably.
Japan’s Commander’s Intent for the Marco Polo to Pearl Harbor campaign can be summarized as follows from the campaign guide:

One key point from the guide is that Japan will not be able to take over all of China’s mainland.There are not enough resources to capture and control the whole country. You have to take enough areas to push for concessions/surrender, while not pissing off the US and its allies into more significant interventions. Some intervention and lend-lease is inevitable. You will not avoid that outright. There is a balance to be met.
This is a remarkable campaign in that it actually pulls this intention off. The Marco Polo campaign forces you to think strategically, even politically. This is very unique amongst wargames on the market. Not many can pull this off in their game engines, but Strategic Command, by its hint of title, allows for Decision Points. A simple but highly functional way to inject decision , and by effect player agency, into the overall decision making for your side. Not many games pull this off well, and Strategic Command as an overall series really compressed this into a simple but highly adaptable mechanic. It’s really impressive what they are able to bake into a campaign with their game engine. All while keeping things very easy to understand. One click Yes or No is the usual order of business. I like the variability of effect they are able to accomplish. Here is a full listing of all of the Japan Decision Points for the Marco Polo Campaign. This will give you a solid idea of the complexity and variety of decisions at hand throughout the campaign.


Also check out the Wiki on the Marco Polo Incident, which spiders out to other pre-ww2 Japanese aggressions. Marco Polo Bridge Incident a part of the Japanese invasion of Manchuria which covers the invasion of China by the Kwantung Army. The Kwantung Gang as I’ve come to call it becomes an important body of Japanese elite troops, spread out over the Pacific Theater towards the end of the war, covered closely by the last two campaigns we’ll discuss in this article. This Army had become one of the more feared elements of the Japanese ground forces in the Pacific. The Kwantung Army was very well seasoned, and adapted well to new environments as it was split up and sent here and there throughout the theater of war.

Above is the initial Marco Polo Incident depicted with a single unit counter. I’ll push on forward to the next Decision Point we hit.
Beyond the initial push near Shanghai, I also push in the Northeast where the combat results look relatively ok to bear. 0:3 is a good computed result to act on.

I want to bring us forward a few turns at least, as then we’ll have a better picture of what resources are provided for the initial phases of the campaign. After we go forwards a turn we get into the baseline overall situation, as the forces begin their build-up. Easier to plan from this stepping stone.


We finally reached our first decision point. I agree with Yes, as it is pretty much a no-brainer for increasing local morale of the existing Japanese troops already in the fight. Also, it’s cheap, only 25 MPP (Military Production Points). Not a lot of actual player agency here, as it’s a Yes likely across the board user decision wise. But, what I do still like about these Decision points, is even if it’s a no brainer one, it helps you along with the historical progress of the campaign. It teaches you about what happened in each phase of the campaign historically. The Strategic Command series of wargames is as much an Educational Wargame as it is Entertaining.
Our overall troop dispositions after the above Decision point is in the below triple screen-shot.

I need to bring the air cover and recon capabilities of the carriers more into play, is one first agenda. That’ll up our intel ante, and then I can make additional decisions based upon Brant’s simple set of planning questions.
Let’s go back to a very quick assessment of BrantDMP:
- What do I think the enemy is going to do?
I am only seeing a few national militia/regional forces in play thus far. A few nationalist China forces are also visible. I do not have a great picture of what is out there and where it’s located. So, first things first, I need intel. Air unit sorties will help with this. Not a great idea to just fight forward blindly and just let yourself run into things willy nilly (unfortunately, my usual wargaming MO). I can bring forces up to bear, and consolidate them in hopefully hidden areas where the enemy AI will not detect and regroup to contend with. If I have any opportunities for MILDEC (military deception) I’ll take them, if they present themselves. - What’s my plan to accomplish my goal with that in mind?
For some reason, I can’t move the naval units yet. They offer me the convoy mode for them, but perhaps they are Frozen for a few turns. We’ll see if they open up to move. I’m also not able to launch any recon from the two carriers. Perhaps they are frozen to depict how long it takes to logistically ready them up for departure from port. - How do I logistically support that plan?
I’ve so far accepted as many buildup based Decision points as possible. To well, build up forces for further decision making sake. - What are the key decisions I need to make, at what times, during the battle / campaign?
At this point, mostly just enough to build up and not piss off all of the international allied crowd. - What info do I need to know to make those decisions?
Trying to get as much air up and patrolling as possible to reveal where the enemy regional and national troops are located, in order to then shape our decisions appropriately. - How do I get that info in time to make those decisions?
Accept as many troop buildup Decision points as possible, and move up any air units to closer air fields as we slowly acquire them towards the front lines.
One key point to make is that you must be ready and willing to re-apply the full set of questions after each phase goal is reached. You can have a big picture goal (the original Commander’s Intent) as an overall litmus, and can plan for that initially, but you always need to adjust for any interim decisions you are forced to take or knowingly make. You can and will pull out that Commander’s Intent repeatedly throughout your operations, as a quick check mechanism.
You will then ask yourself:
- Are we still moving towards the end state of the Commander’s Intent?
- Will the decision I’m about to make help this intent?
- Do we need to adjust anything to re-align to the overall intent?
- Am I letting the enemy dictate my actions, or are we in control of our actions?
- What am I doing to make the enemy react as opposed to act?
The OODA Loop overall remains integral to success:
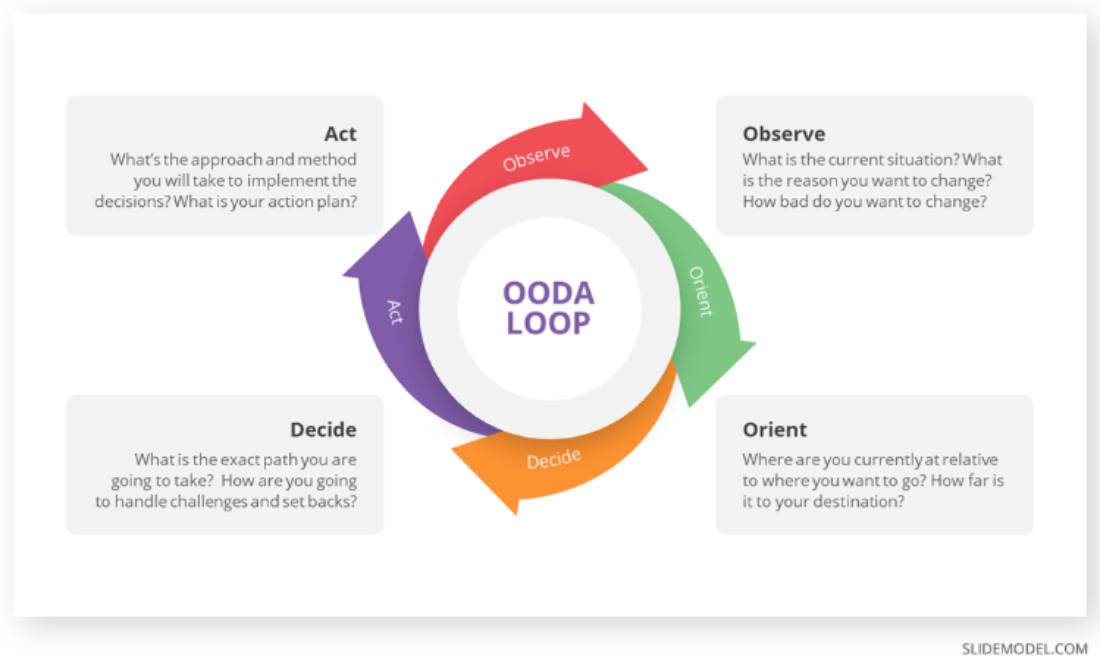
Your ability to move through your OODA loop quicker and more productive than your enemy/competitors, equates to success. This is a tried and true formula. It works. It is also never perfect.
We bring ourselves up to Turn 3, and we are provided another Decision point.


Ok, so, again, clicking Yes, it’s another mostly no brainer. I think the only reason you would NOT do this is if you 1.) wanted to save the moola, it’s a bit of money. Or 2.) wanted to preemptively cool your jets international tension wise. I honestly would be interested in playing this out both on the YES and NO paths, but for now, let’s YES it up.
As a result of our YES, special naval forces (Japanese SEALS I guess) show up.

So the Japanese Special Navy Infantry somehow look like Star Wars Death Troopers, which I guess is cool.


Ok. Let’s get ourselves a couple more turns forwards and then we’ll re-assess a bit by re-gauging the answers to the original set of questions.

As seen above, I’m able now to bring up the carriers closer to the action. Keeping them far enough away and tucked away as not to be right in a SLOC (sea line of communication) , so as to hopefully avoid any enemy sub, surface, or air threats.


As shown above, we need to start also integrating checking the Purchase, Diplomacy, and Research tabs. For now I’ve put in some money towards increasing diplomatic pressure on the USA to avoid their intervention.
As we’ve gotten some good baseline units for now, I avoided production until knowing what we need more of. It’s time to go ahead and beef up areas of our combined ops in need of a bump. I think for now, we need more ground units in general. So I’ll purchase a few so as not to go broke too quickly.


….. And so on and so forth. We are up to turn 5+ now, and in a good position to have continued success. For this First Impression sake, we’ll stop here.
Another Tool: The Five Ws
When in doubt, fall back to The Five Ws. *Apoc from the Tanksim Discord recently said that to me and it’s stuck in my brain. This is always a tangible fallback decision mechanism when you are in a pinch. Who is involved, What resources do they need to bring to bear, When do they need to commence and complete their actions? Where are they going? How do they plan to mitigate risk? How do they plan to coordinate efforts? Why are they doing what they are doing? The famous acronym used in modern planning guides is IOT, or In Order To. Why? In Order to is one of the best phrases you can remember as a wargamer, as you need to know Why the heck you are doing what you are doing. To what end? What end state are you trying to make a reality?
Remainder Of Campaigns
{Will be Covered In Further Parts As An Article Series}
For now, here is a simple gallery of shots from all of the campaigns. We’ll cover each in more detail over time. This is a wargame and DLC worth taking the time to play and appreciate for the long haul.


First Impressions & Final Thoughts
If this DLC only included Marco Polo, Olympic, and Coronet campaigns I’d have been a very happy camper. The fact that it also includes a Japan focused mid-war campaign, an Invasion Of India campaign, and a full flown Okinawa campaign, is just mind-blowing. Seriously, this is one of the most fantastic DLCs I’ve ever played for a wargame. I don’t say that lightly. Other wargame production companies should be aware of the level of offering this DLC includes, as this is sincerely my new litmus for “The Best” in DLCs. I can’t recommend this highly enough. If you own the core game, buy this DLC. Just, go for it.
One of the best compliments I can personally give any wargame is whether or not it encourages me to study new areas of operations (many mostly forgotten in the annals of the public mind at least) of any war that I thought I’d known a good amount about. This DLC does that for you. It covers pre-war China, mid-war Japanese strategies, the main thrust of the Burma/India conflict, Late war What-ifs, all in one package. Just bravo. Strategic Command: War In The Pacific’s Rise And Fall Of An Empire DLC has made me seek out research material on all of these areas of operations. I have to thank the producers and developers of the game. I have newfound respect for the exploits and experiences of the Kwangtung Army in particular as a result.
It honestly takes a lot for me to want to play any new WW2 games or DLCs.. The conflict has been covered over and over and over again. Of course, I still play them all :), but, the point is, any new wargame or DLC really needs to wow me with its coverage to score high in my book. Rise And Fall Of An Empire is high on my list. Get it.
APPENDIX A – Alternative Sets Of MDMP Questions To Use
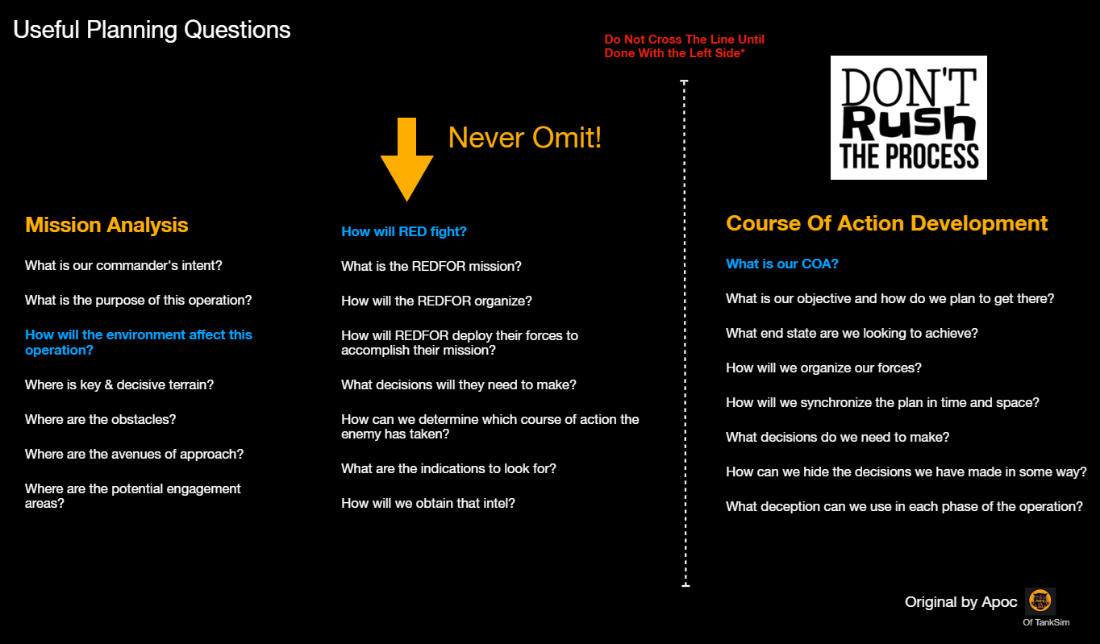
Below is a very solid set of abridged MDMP questions to apply to your hobbyist wargaming by friend Apoc of the TankSim Discord community. I use these often for my own wargaming. A little more on point to the original MDMP, but not that much more difficult than BrantDMP™.
The BritDMP™, as I’ll call it, is the standard British Army’s Combat Estimate. A very good alternative set of questions for QuickDMP in general. Perfect for the hobbyist wargamer’s consideration while playing any wargame.
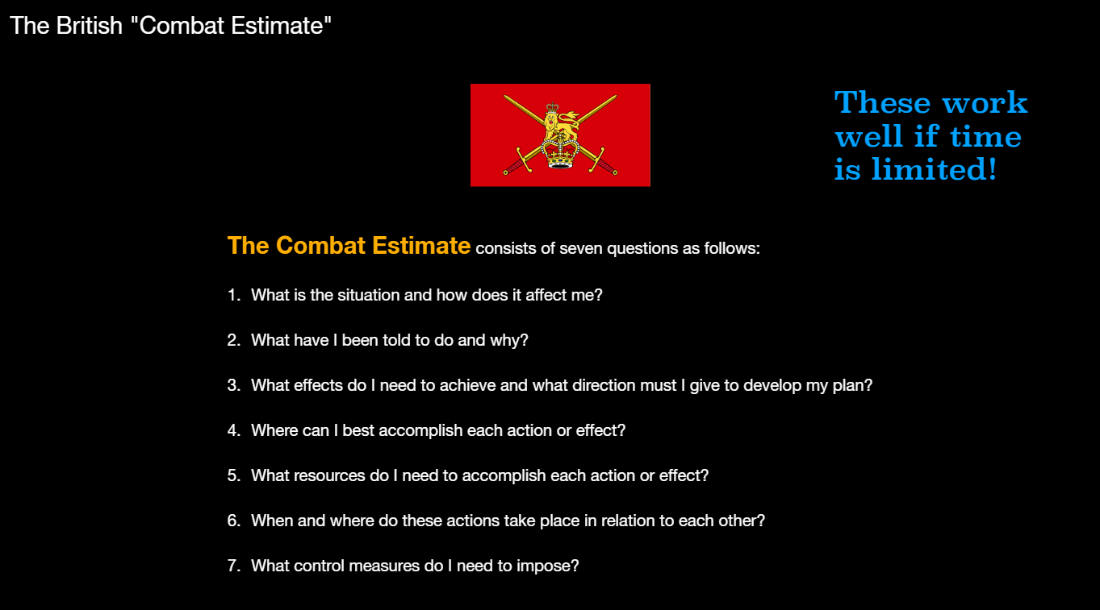
The Combat Estimate – A great go to planning device.
Another great resource, tangential, but just in general an outstanding resource for wargaming planning sake is Orders : A User’s Guide.
Thank you for visiting the Regiment of Strategy Gaming and riding with The Armchair Dragoons.
Rather than list a bunch of social media links, the easiest thing to do is to check out our LinkTree, which connects you to all of our various locales around the web.
You can also support The Armchair Dragoons through our Patreon, and find us at a variety of conventions and other events.
Feel free to talk back to us either in our discussion forum, or in the comments below.
Footnotes
- also an incredible game
- From Steam
- ed note: this is giving Brant too much credit; following a conversation with the author 2-1/2 years ago, he independently developed the following based on the an older MDMP workbook Brant developed


