
 by
by Paul LaFontaine, 2 August 2026
A study in using timing to offset a disadvantage
The Battle of Vitoria, 1813, was the final nail in the coffin of the French adventure in Spain during the Napoleonic period. Wellington, in command of a force of around 80,000 defeated Napoleon’s brother Joseph, who commanded a force of 50,000. The defeat was total, and it signaled the fatal decline of the French fortunes coming on the heels of the disaster in Russia.
We had six players recreate this engagement with a Kriegsspiel conducted remotely via Discord, using either physical pieces on printed maps or their own Tabletop Simulator module if a physical set was unavailable to them. The umpire map and pieces were physically on a table. In this session the umpire sent partial images of his table via Discord and verbally described the events.
The place names were disguised, the force commands distributed for the number of players and the map flipped 180 degrees, reversing north and south. This would keep players from simply repeating the decisions of the past.
SeanLambert, Rebelsqrl and Seabass played the French command while Dr Truth, Langbart and Nickthenuker played the British. SeanLambert steered the French team to victory by adroitly using the objective as a place to disrupt British timing. This timing was key in the historical battle, and the divergence of plan from our players provides a fascinating comparison.
The Problem
The French are outnumbered and have to protect a long line of communication through the town of Vitoria (Avon). They have to employ a flexible defense and rapid decision making to ensure their forces are at the right place and time to offset the British numerical advantage. The British have to fight through rough terrain over a wide area. Communication and flexibility will be difficult if they are to achieve any sort of concentration and achieve their objectives.
British (Red) Briefing
Your Order of Battle:

most images can click to enlarge
Two commands have marched to different areas, as shown on map below. The Cavalry and Artillery can be kept together under the CiC or task organized into the columns.

The enemy is known to be across the river spread between Avon and Grasse. They reportedly have more artillery than you do, and you have more infantry than they. Cavalry seems evenly matched.
Your mission is to cross the river, defeat the enemy force and seize the critical road junction at the town of Avon to gain control of the region.
French (Blue) Briefing
Your Order of Battle:

Two commands are in position in different areas, as shown on map below. The Cavalry and Artillery can be kept together under the CiC or task organized into the columns.

The enemy is known to be south of the river spread between Sens and Issy. They reportedly have less artillery than you do, however they outnumber you in infantry. Cavalry seems evenly matched.
This is another of a series of Kriegsspiel AARs very similar to the events in our Wargame HQ at the Origins Game Fair. You can find the original article here.
Your mission is to use the defensible terrain and the river, defeat the enemy force and hold the critical road junction at the town of Avon to maintain control of the region.
Planning Comparison Players vs Historical
The British
Historically Wellington divided his forces into four columns with the intention of attacking the French all along their position. The four columns were positioned to reach the river at the same time.

In the game, Dr Truth divided his force into two efforts, one to march toward Grasse (Heights of Puebla) and the second effort to cross at Avon (Vitoria) and secure the objective.

He later shared that he expected the French to dig in and defend Avon. His forces would converge there. He timed his river crossings so the two forces would arrive simultaneously.
The French
King Joseph of the French chose to defend Vitoria in depth, with his main force near the Heights of Puebla and a secondary force guarding the approach across the river at Vitoria.

Wanting to have a sufficient warning of a British flanking effort near Gamarra Mayor, King Joseph had elements of his 3rd force across the river.
In the game, SeanLambert chose to concentrate his force, moving his larger division under Rebelsqrl to Grasse, taking up a defensive position on the heights there while the reserve force under Seabass was to move to a position southwest of Caen.

SeanLambert planned for a specific enemy reaction, knowing the town of Avon was the major British objective. The plan was to allow a portion of the enemy force to take the town and hold it. He hoped to use that delay in participation of that force to his advantage and defeat the portion of the enemy outside of Avon.
Historical Outcome
The French deployment anticipated an attack at the Heights of La Puebla and Wellington obliged. He sent Spanish and Portuguese units to attack the heights at 8:30 am. The attack was a success, driving the French out of positions there.
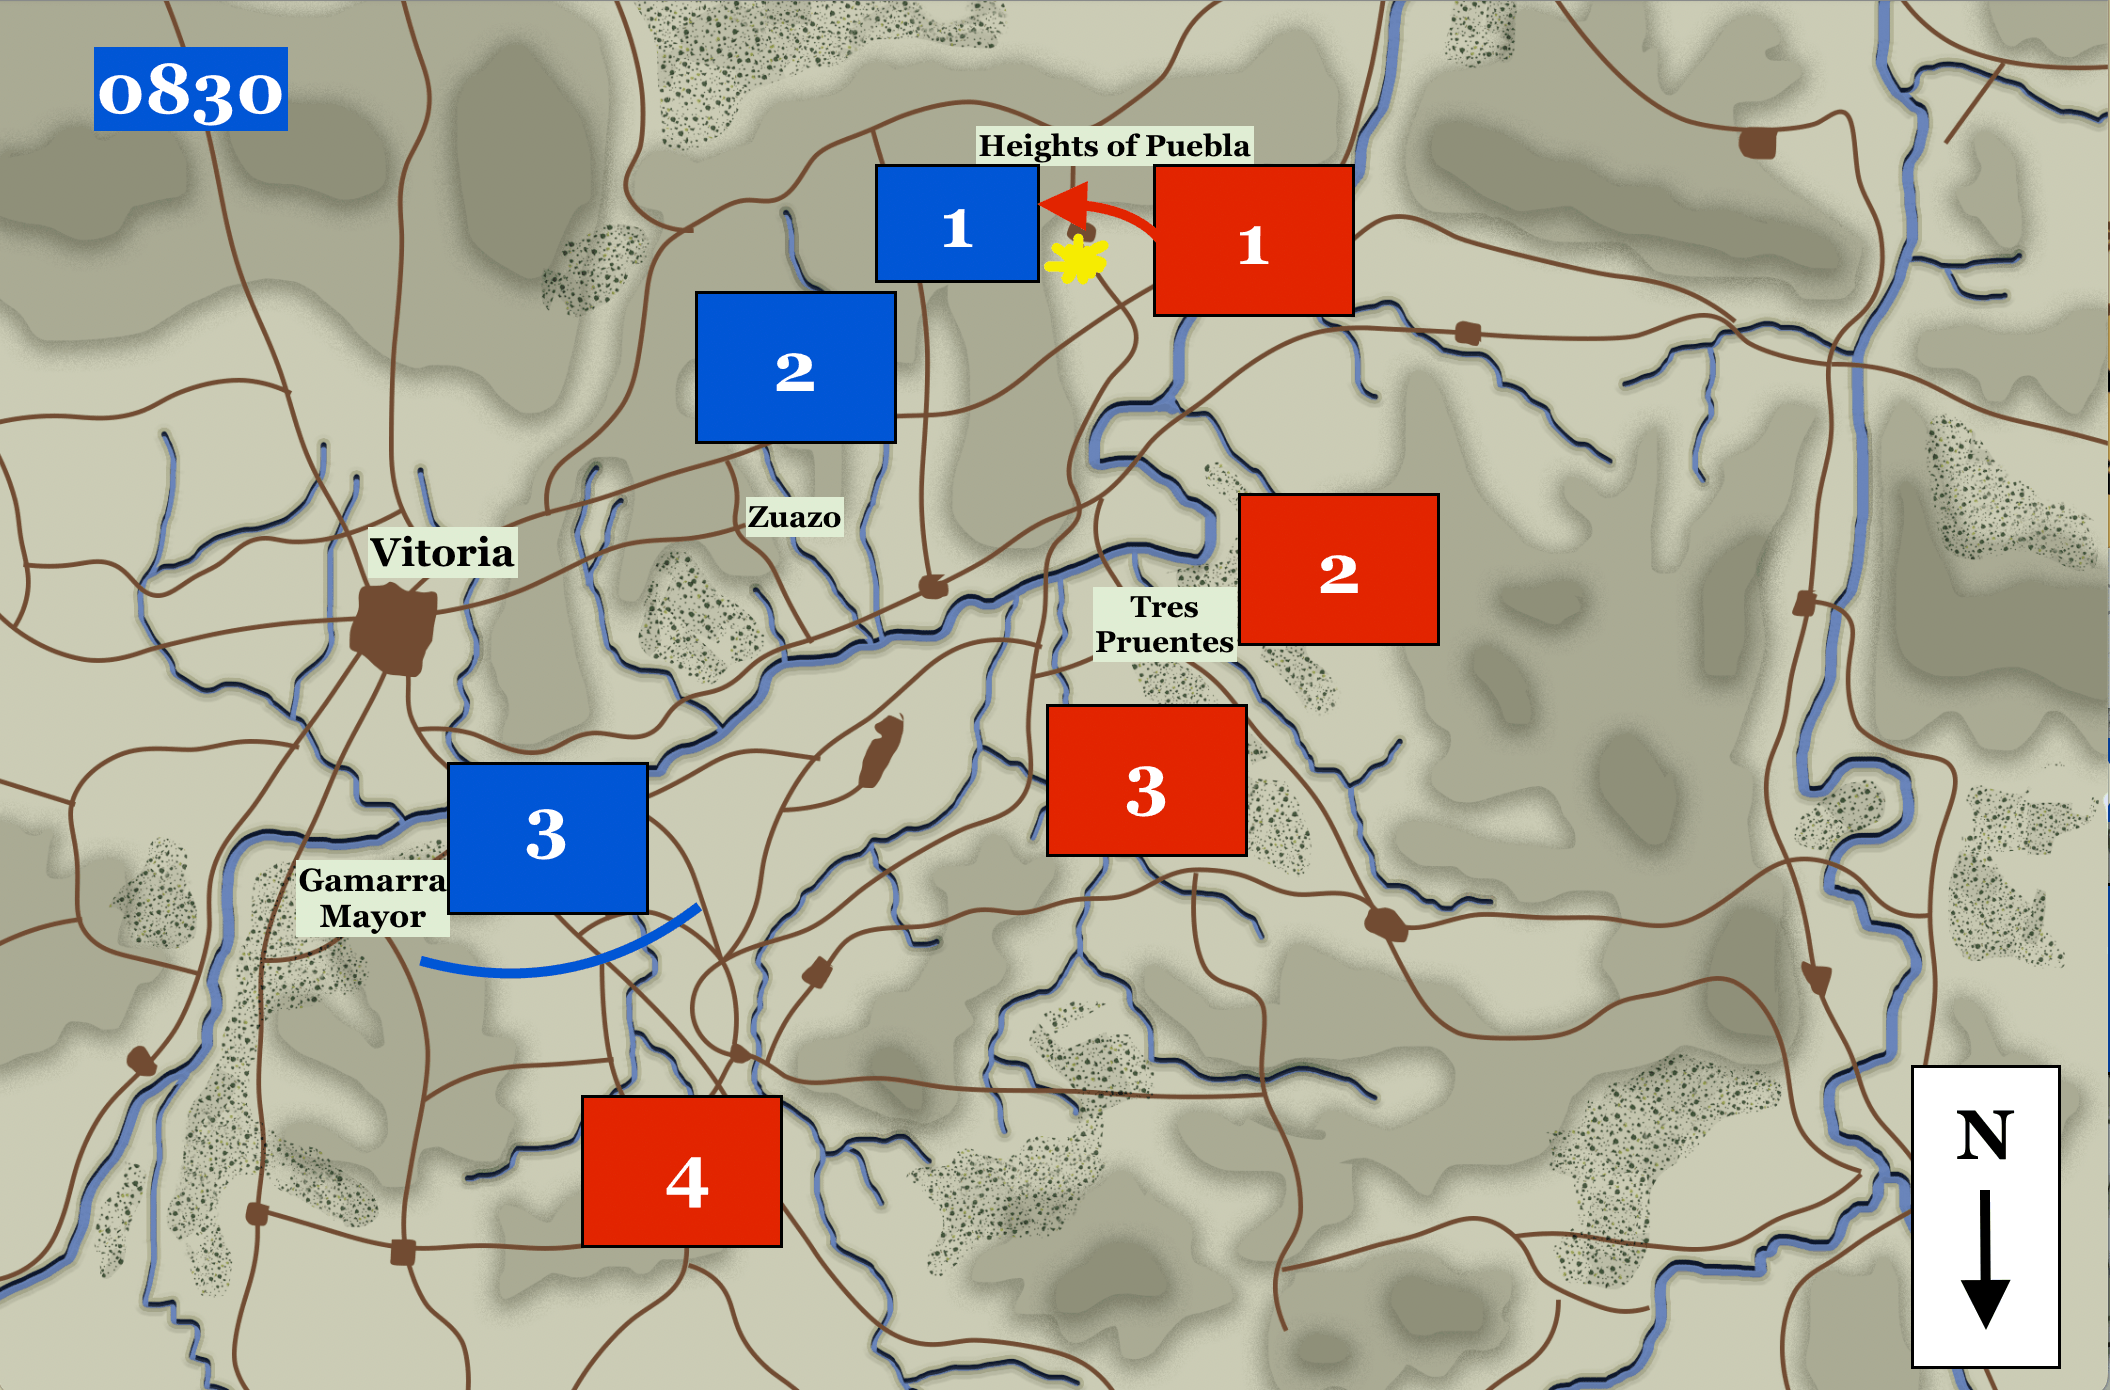
King Joseph and his Chief of Staff, Marshal Jourdan, saw the British forces opposite their center but believed this to be a diversion. They then made a critical error. Believing the main attack was where the morning fighting had occurred, they weakened their center and reinforced the defenses on the Heights.
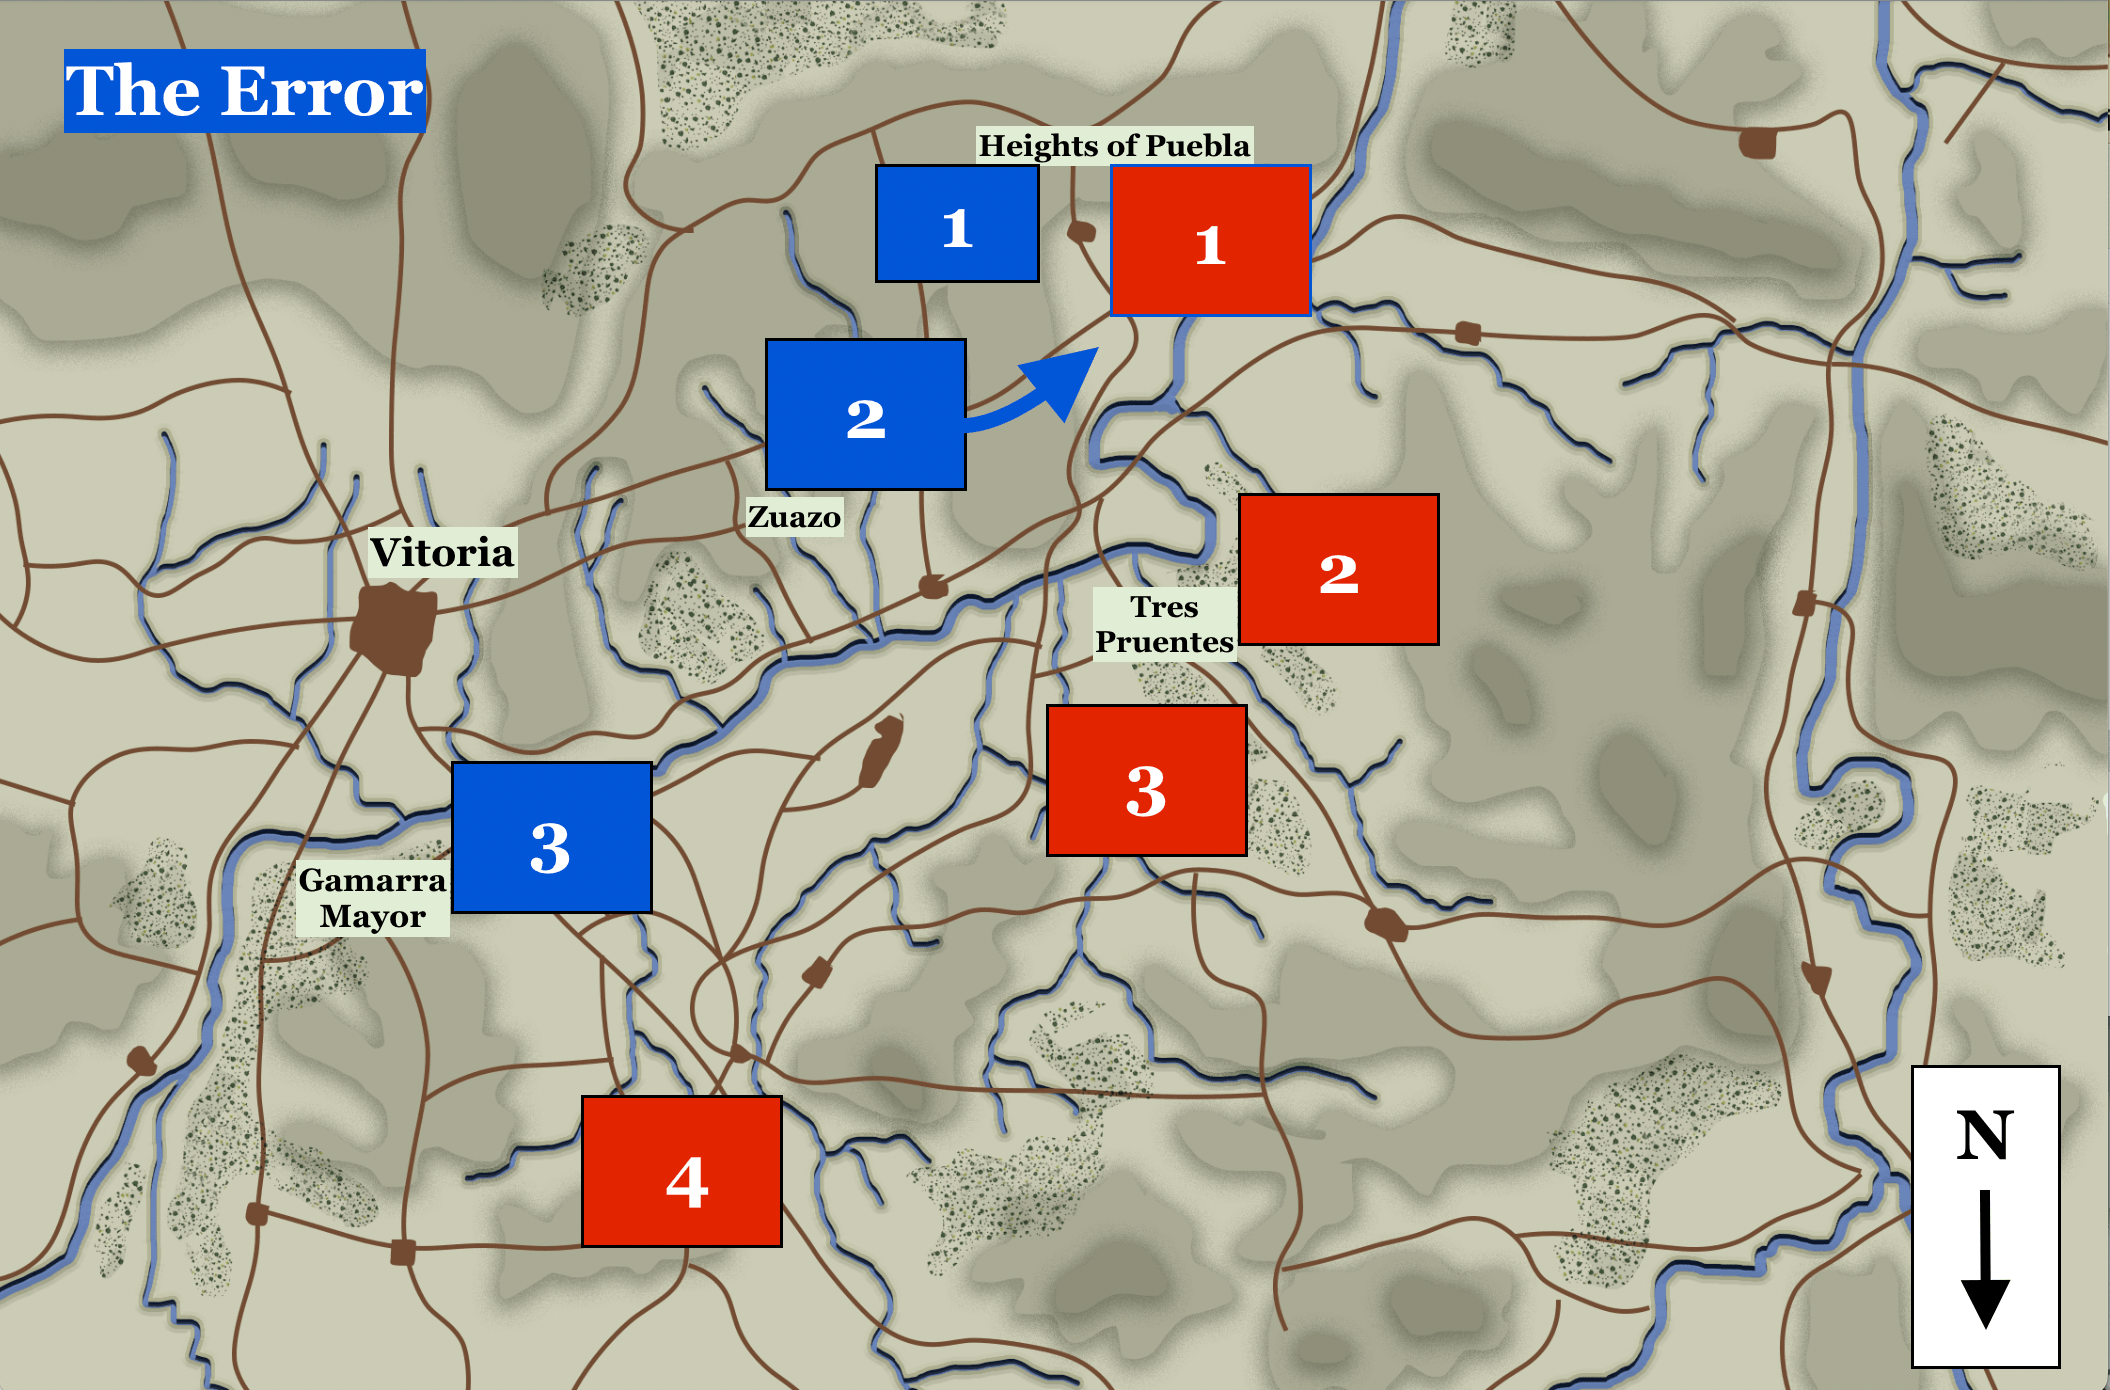
With a single division, Wellington had drawn two enemy divisions into the Heights, creating an opportunity in the center.
As midday approached, the British initiated an attack over the river crossings at Gamarra Mayor. These were Portuguese allies who attacked Spanish soldiers loyal to King Joseph. The fight was chaotic and bloody.

At 1 pm Wellington received a report that the bridge over the Zadorra at Tres Puentes was unguarded. The British crossed and by 3 pm a bitter struggle in the center ended with King Joseph seeing his line on the Puebla Heights and at Vitoria being driven back while his center was collapsing.

King Joseph felt he had no choice. At 5 pm he ordered a general retreat. In the subsequent chaos the French lost all 153 of their guns and their wagon trains, loaded with plunder from the Spanish nobility. The British soldiers stopped their pursuit and an enraged Wellington watched as his victory became an exercise in looting a vanquished foe.
The British and their allies suffered approximately 5,000 casualties, while the French lost an equal number with 3,000 being captured as prisoners.
Turn 1 – OPENING POSITIONS

Referring back to the players plans, the British under Dr Truth are going to attack from two directions. Dr Truth keeps control of the cavalry to discover the enemy positioning, while attack through the heights to Grasse under Langbart (1) delivers the combat power to drive out the enemy. Nickthenuker marches toward the river to attack Avon directly (2).
SeanLambert positions himself with the larger force under Rebelsqrl, defending the heights near Grasse (3). Seabass commands a smaller force in Caen.
Turn 3 – 1000

Dr Truth moves north to view the disposition of the enemy forces while his cavalry cross the river to join him (1). Rebelsqrl moves the larger French force into defensive position on the ridgeline (2). Langbart ensures the security of his force by moving his infantry to the bridge only after the artillery is positioned to support (3).
Nickthenuker probes near the river to determine how strong the enemy force is in Avon (4). Seabass follows the plan and marches east to take position as a reserve (5).
Turn 6 – 1300

After several turns of maneuver, Dr Truth sends cavalry along the road in the north to determine the shape of the enemy defense (1), while Langbart aligns his forces preparing to attack when ordered (2).
Seeing the cavalry pull back from Avon, Nickthenuker pushes north to take the objective of Avon (3). SeanLambert has pulled in Seabass and set him up on a defensive position facing down the road to Avon (4). At this point the French have created a strong point around Caen.
Turn 8 – 1500

Dr Truth is in the north with his cavalry forces (1) as Langbart holds along the heights near Grasse (2) and Nickthenuker holds Avon (3). This is as SeanLambert had planned. The British force in Avon is now delayed in supporting their colleagues, and the British commander is distant from both commands. To shorten his communication time, SeanLambert calls Rebelsqrl and Seabass into a colocation so they can speak directly (4). He instructs Rebelsqrl to prepare to attack the enemy before them.
This is the realization of the French plan. British forces are distant and not in support of one another based on holding at the objective. The British commander had a communication lag where the French do not.
Turn 9 – 1600

Rebelsqrl launches his attack columns on Langbart‘s defending lines (1). Nickthenuker, begins marching toward the action as both he and Dr Truth realize the entire force is needed (2). SeanLambert orders Seabass to attack the enemy line’s left flank, which gives the French local superiority.
Turn 10 – 1700

The British line under Langbart breaks due to the flanking movement and withdraws (1). Fresh forces under Nickthenuker arrive to a bombardment from the French force on the heights, which slows its approach (2). The battle has reached its culmination. The French force has survived another day, its artillery and force still able to operate despite high casualties. The French withdraw across the river screened by cavalry and artillery. The British stop their effort to consolidate. Both sides may claim victory in the paper, but those who are knowledgeable on such matters understand that the French can still contest Spain, the Austrians will remain on the sidelines and Napoleon gets much needed breathing room to reconstitute his army and deal with the Russians who come from the East.
Observations and Conclusion
Rarely do we have the opportunity to so clinically compare a historical plan against a player approach to identify so specific a use of timing and the difference it made. SeanLambert‘s decision to not defend Vitoria (Avon) which allowed him to concentrate on a portion of the enemy force, diverges from Joseph’s plan significantly. Dr Truth’s not using the center, and maintaining two strong forces, was also different from Wellington’s approach. There are several “what-ifs” that can be traced from these individual decisions, and what we saw is that these decisions combine to create a different outcome.
The game being used is Battle Decisions: Kriegsspiel from Catastrophe Games.
Command proximity played a key role in the scenario. SeanLambert‘s colocation made clear instruction to his subordinates easier. Historically, a solitary King Joseph saw from a distance the unhappy outcome on his far flung wings as the British made progress. Dr Truth was trying to coordinate by dispatches, always a difficult task.
All the players in this scenario are experienced and capable. All attended to their in-game duties, communicating well and ordering tactically intelligent moves. The difference was structural, embedded in the pre-game planning phase. Decisions there triggered subsequent events that logical decisions ended in our outcome.
This scenario used the historical terrain, which did shape the battle. The Zadorra was integral to the decision making. The constraint is the player’s ability to print out a physical map. The more resource demands you make on the players as the host and umpire, the fewer of these studies you can complete.
My source of inspiration was Issue 15 of the Wargame, Soldiers and Strategy magazine. They have an online subscription that allows for access to their back catalogue to which I subscribe. The description of the action, and more importantly, a detailed order of battle, allowed me to create the forces in a way that they mirrored the historical in strength and composition. It is a great resource.
I listened to the British Battles Podcast episode for details on the battle. Host John Mackenzie described the various units and action over the course of the day that increased my understanding both of the campaign and the battle itself.
Play time was 90 minutes and nine turns, making each turn 10 minutes per. Six players enjoyed the game, and with one umpire this is well above the normal 3:1 ratio which is preferred. I used screenshots to try and speed the action but the players reported enjoying more abstracted reports from previous games rather than specific pictures. I will have to see how I can return to that style of report without slowing things down.
The turn lengths were consistent across the game so later turns with more combat did not slow the process. Dipping in and out of channels, having to update screenshot and alt-tabbing around with a 6:1 ratio is about 10 minutes a turn for an experienced umpire with a very fast system like Battle Decisions Kreigsspiel.
Which brings me to the larger goals for conducting Kriegsspiel. Though it can be fun for those who enjoy time pressure, simply processing Kriegsspiel as an umpire is a bit like playing whack-a-mole with DIscord. The environment is harried and the act of processing a game does not allow for a lot of time to reflect. It is in considering the results, after having done research on the battle, that I saw the connection between the plans the players made and the outcome as distinct from that same connection historically. Sitting with, and in the AAR process is the path that the umpire walks to become a participant in a form of discovery. And he can deliver the results back to the players and history enthusiasts in general.
Thanks to Dr Truth, Langbart, Nickthenuker, SeanLambert, Seabass and Rebelsqrl for playing. It is a great group to explore with.
We’ll see you out there.
If you’d like to join one of Kriegsspiels you can pop into this part of our forum for more
and you can also find out about the International Krieggspiel Society here
Thank you for visiting the Regiment of Strategy Gaming and riding with The Armchair Dragoons.
Rather than list a bunch of social media links, the easiest thing to do is to check out our LinkTree, which connects you to all of our various locales around the web.
You can also support The Armchair Dragoons through our Patreon, and find us at a variety of conventions and other events.
Feel free to talk back to us either in our discussion forum, or in the comments below.


