
 by
by Peter Robbins, 15 May 2026
Following our first impressions of Modern Naval Warfare, here comes a look at the initial scenario of the campaign.
Campaign Initial Scenario
Below is the one campaign offered with the release version of Modern Naval Warfare. I personally would have liked to have seen two or three, but beggars can’t be choosers as they say. What is here contains a reasonable amount of variety. I personally would like to see a full fledged mission editor and workshop support for getting those scenarios out to the community at large. I’m hoping someone may be able to figure out how to make a scenario maker of their own if the files are easy to parse out a pattern for, etc. it’s very likely someone will until an official editor potentially sees the light of day. We’ll see. Again, one can dream. This is an outstanding game that I think is destined to quickly become better and better over time as they continue a roadmap of features. Hopefully.


click images to enlarge
Let’s Lightly Talk Tactics
Ok, so let’s talk general tactics for a Virginia class SSN captain. The “kill chain” is the following (the words used for this sometimes change, depending upon the generation of the skipper or the nation involved)
- FIND = build awareness
- FIX = solve geometry
- TRACK = preserve solution
- TARGET = exploit the solution violently before the enemy realizes you exist
On the flip side, those enemy that are looking to do the same to your sub are using something similar to this listing of Full Spectrum ASW:
- Create conditions where an adversary chooses not to employ submarines.
- Defeat submarines in port.
- Defeat the submarines’ shore-based command-and-control (C2) capability.
- Defeat submarines near port, in denied areas.
- Defeat submarines in choke points.
- Defeat submarines in open ocean.
- Draw enemy submarines into ASW “kill boxes,” to a time and place of our choosing.
- Mask our forces from submarine detection or classification.
- Defeat the submarines in close battle.
- Defeat the incoming torpedo.For a more direct Modern Naval Warfare interpretation of the 10 principles, see the AI Generated guide I’d orchestrated over here.
Most of the above is continually being worked on by the enemy in addition to their attempts to FIND | FIX | TRACK | TARGET your submarine. The enemy has a vote in all warfare! They are trying to take you out with as much vim and vigor as you are them. The enemy is not only using F-F-T-T. They are using operational strategies like the Full Spectrum ASW list devised by CAPT Toti (US Navy Ret.) to hunt you down and defeat your platform.


So, first up in any of these scenarios, is a good bit of patience (not my strong suit). You normally are “pointed at” the likely enemy activity, but not always right at them.Some zig-zagging and rechecking sonar may be needed to start seeing any outlying ships that are a part of the main target surface group. The best helper in these situations is hitting [SPACE BAR] to get the main overlay, and then fast forwarding time scale a bit. I normally only take it up to x6, as if you go any higher, depending upon your computer resources, the game will automatically bump you out of the time compression mode. So, take care to determine what your system can handle. I’d think most systems that can run the game at all will handle x4 or x6 compression regularly.

One thing to quickly notice in the above is that it did not take long for this potential enemy’s bearing to change rather significantly. Your internal spatial mind alarm should be ringing loudly, that your sub is in the process of passing the target, and that it’s likely close by if the detected bearing is changing that quickly on the broadband waterfall. Also take note of the contact designator of “S1”. Surface contact, for now an Unknown, but after we get visual confirmation with the mast FLIR systems, we’ll generate a “V1” or visual contact. The TMC or target motion calculation system, or Fire Control system can assign S1 or V1 to a given weapon for firing sake. You have a choice throughout on which “contact” to use when firing.
Ok, so it’s very dark out, based upon your reckoning of the time outside by way of the wall clock. So, periscope depth it is. Not something you want to do anywhere near potential enemies, nor in the light of day, but we will take the risk to take the potential shot.
Of note, by default, your loadout is two Mk48 torpedoes in Tubes 1 and 2. And two Harpoons in Tubes 3 and 4. A good standardized initial loadout. In addition, it takes time to flood the tubes, open the door, and arm the weapon to fire. Not to mention it does take time in assigning a TMC tracked “solution” to the given weapon. While all of that is done at the Fire Control station, it takes time to click between the screens on the display and do the needful. So just factor that into your timing overall when firing weapons.


As seen above, I went quickly to the Pilot station and first took a nice unaltered PAUSED shot to show off the absolutely beautiful graphics of the game, and then I unpaused and right clicked on the AI Pilot station. You’ll know it’s the AI seat as, first of all, there is a 3d person sitting in the seat (always a first clue), and then the station overlay has a RED icon, as opposed to a YELLOW/ORANGE colored icon.
The Pilot station’s AI is the most complete of the bunch (just working functional tasks wise) at least in my 20hours+ with the game so far.
So, back to the action, we are assuming our S1 contact may “not” be enough for good TMA (target motion analysis), but, we do go ahead and generate a solution from S1 and fire off a torp just for shites and giggles.
General Steps For Passive Firing Solutions
- Get a contact via Passive Sonar on the Sonar Station (FIND)
- Once you get a clean detection set with [Tracked] button pushed, that action sends the bearing information over to fire control for TMA (target motion analysis) (FIX)
- Now while on the Fire Control station, we use the TMA functionality of the station to compute a solution by way of multiple demon waterfall bearings sent from the SONAR. This then allows you to properly (TRACK) and maintain a solution for the target over time.
- Now you select a weapon, apply the solution to the tube involved (which relays the information to the weapon inside), then you (TARGET) the enemy and fire (ENGAGE) the torpedo or ASM (anti-ship missile).
- F-F-T-T in action!!
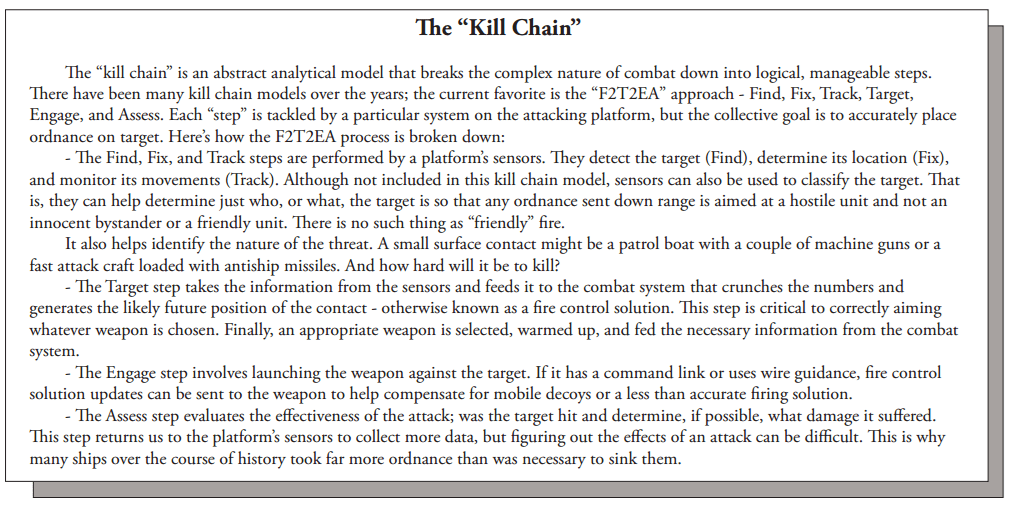
Here is the Kill Chain description from the Harpoon 5 Miniatures Rules. It is one of the best descriptions I’ve ever read.
Now we are selecting the contact, using a small digital ruler on the screen to align the information from each new bearing measurement; which forces the computer to adjust the computation accordingly. You are then able to manually adjust parameters before applying the changes to the computed solution.

And then the even funner part. You are flooding the tube involved. Opening the outer door for that tube. Arming the weapon based upon the solution you’ve sent to it from the other screen. Then if all goes well and everything is detected as ready, you FIRE the torpedo. On the way!

After the torpedo has been fired, the Fire Control system will show a track for the torpedo as it makes its way “towards” the target. I won’t say “to”, as a hit is not guaranteed here. Especially with this attack angle, this is a long shot, literally. We’ll want to switch over to visual FLIR via peri depth and the several masts that combine for visual ID on the Virginia class submarine.


Notice above that the main Display station in the control room also displays any targeted tracks, as well as the torpedoes on the way.
Now, let’s take a quick look at visual FLIR queues from the mast. And how to send them over additionally to the Fire Control System.

Above you’ll see my first view of the target. Notice how all of the “contacts” are overlaid to their current detected bearings. That is an awesome visual clue as to where to rotate the mast for a look-see. Then, as a very high powered FLIR camera, you can zoom in several times over, very well to the edge of the visual horizon, which is roughly 20km from mast height. The thermal modes for the camera gives you a solid picture of the hull of the enemy surface ship against the cold night sky.

No, we’ll use the [MARK] button to send the visual queue to the targeting computer at the Fire Control system console. Now, you’ll see it available in the pulldown menu for applying a fire solution to a tube (and weapon) of choice. Here you see it show up as “V1”. Also note the second pull-down which actually allows you to use the Visual queueing to “correct” the “S1” sonar target solution, with the visible [Merge] button there in the interface. (in the pic it shows S2 but I’d change that to S1 and merge it if I didn’t want to only use the Visual contact for targeting*). Hope that makes sense.


Et voila, destroyed inbound terrorist supply run. Mission success. This took firing on a likely civilian contact! Doh, and a second visual queuing of the rather slow plodding target to pull off. Not too bad for a first try at the game’s campaign.

You can chat about this game in the Modern World section of our discussion forums
Thank you for visiting the Regiment of Strategy Gaming and riding with The Armchair Dragoons.
Rather than list a bunch of social media links, the easiest thing to do is to check out our LinkTree, which connects you to all of our various locales around the web.
You can also support The Armchair Dragoons through our Patreon, and find us at a variety of conventions and other events.
Feel free to talk back to us either in our discussion forum, or in the comments below.


