
 by
by Paul LaFontaine, 29 March 2026
This scenario was a map of an area near Bentonville, AR and the game was the Battle of Pea Ridge. Player Soldiersteve commanded the Confederate (Red) forces, player August commanded the Union (Blue) Forces.
All players and the umpire had physical sets at their locations, and the umpire reports were pointers so the players could keep the situation on their own maps.
One player needed to reprint his map, so the setup and planning took 40 minutes. We played for 54 minutes, and 7 turns were completed (8-minute turns). We conducted a 20-minute verbal AAR at the conclusion.
The game being used is Battle Decisions: Kriegsspiel from Catastrophe Games.
Soldiersteve as the Confederate commander emerged victorious, though August did a great job maneuvering his troops given this was only his second Kriegsspiel. Both players reported enjoying the matchup, though we agreed at 1 v 1 some of the enjoyable fog of war that the format provides was lost. This scenario can accommodate up to 5 players.
The Problem
In this problem the Union force is outnumbered. The Confederates have a 1.5 to 1 advantage. The Union has dug in along the southern road. The Confederate problem is how to offset the advantage of these defensive positions. The Union problem is that the Confederates can maneuver on their flank and cut their line of supply north.
Confederate (Red) Briefing
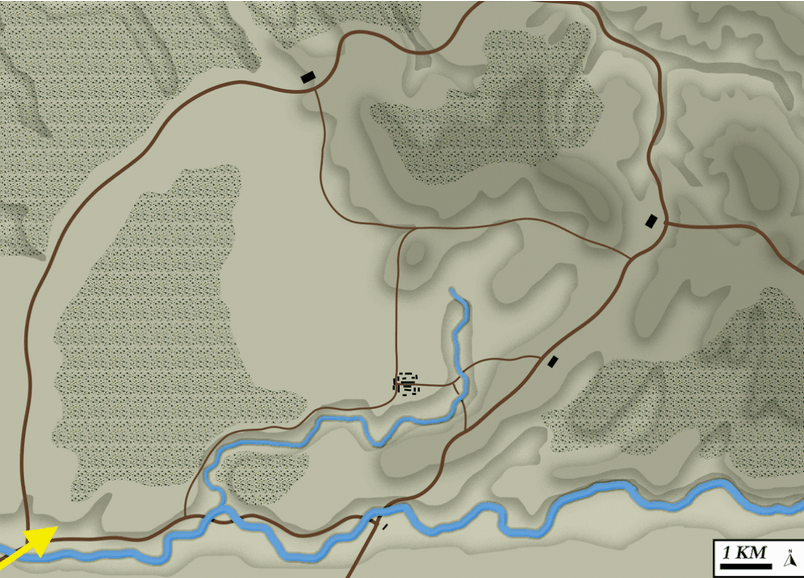
The Confederate forces were composed of 15,000 soldiers separated into two brigade sized elements. The mission is to cut the enemy line of supply and defeat the, securing Arkansas and Missouri through dominance in the field. Their start point was the road in the southwest corner of the map (yellow arrow):
most images can click to enlarge
Union (Blue) Briefing
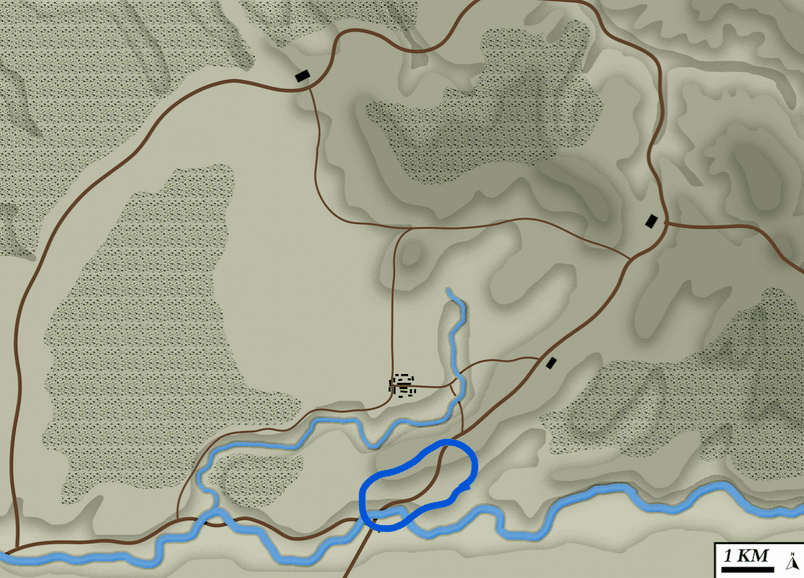
The Union Forces had 10,000 soldiers divided into three forces, two infantry and one cavalry. The mission was to complete the earlier victory in Missouri by defeating the Confederate forces in Arkansas. Their forces started dug in along the Telegraph Road (Blue oval):
0900
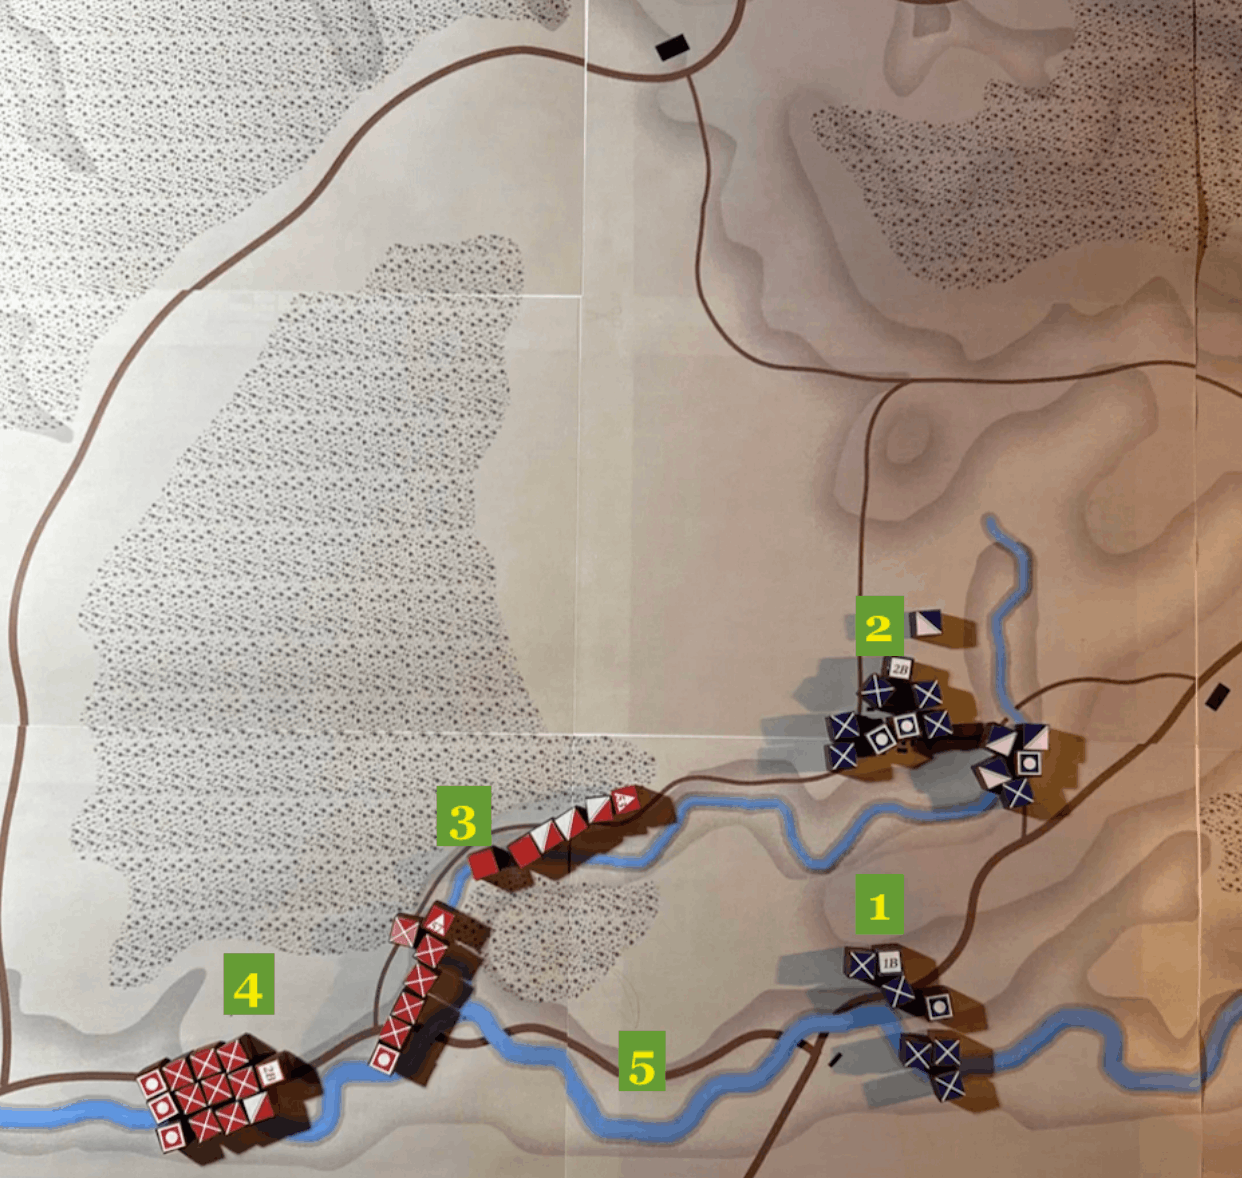
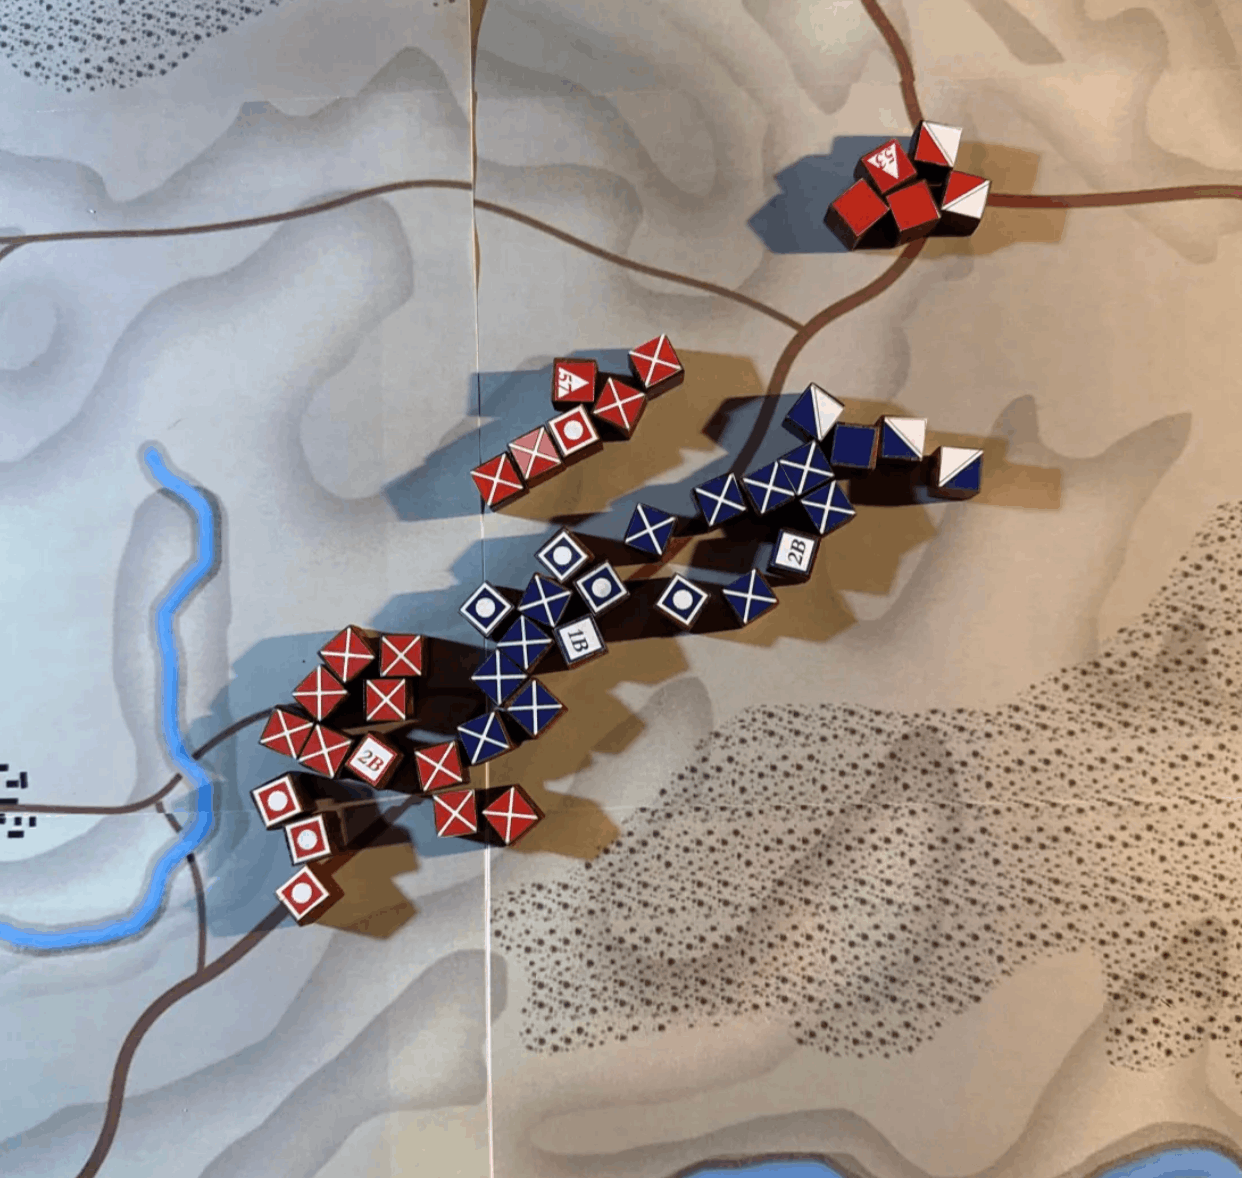
Union Commander August keeps his first infantry brigade south (1) in the entrenched positions and moved his second brigade and cavalry north to Leetown (2). He successfully anticipated a move on the town, and his starting disposition reflects the historical move north.
Confederate Commander Soldiersteve focused on Leetown, leading with his Texan cavalry moving up the road through the woods (3) followed by the Arkansas infantry. The second brigade moved east following (4). He also sent a squadron of cavalry east to establish the location of the entrenched positions (5).
1000
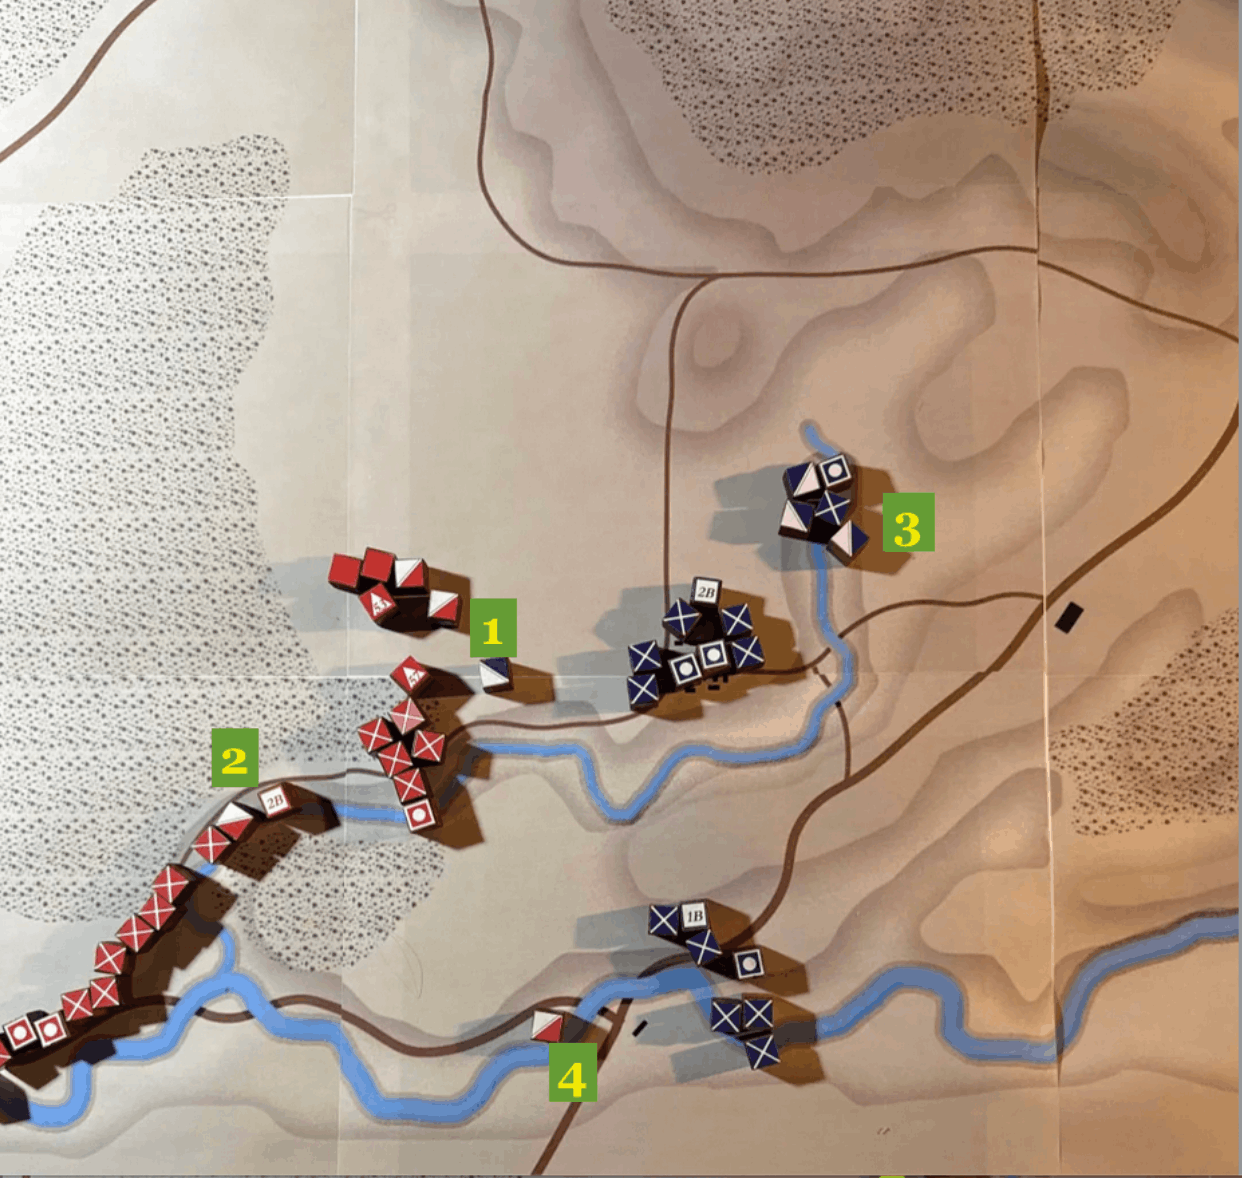
August sent a cavalry squadron forward to determine the nature of the enemy forces (1) as Soldiersteve sends his cavalry north. They skirmish, and the Union cavalry is driven back. The Confederate infantry moves up into the woodline opposite Leetown as the 2nd Brigade moves up in support (2). Soldiersteve orders the artillery up to prepare for an assault on Leetown.
The Union cavalry moves north to protect the flank (3) as the Confederate squadron in the south identified the Union concentration in the southern defensive breastworks (4). The Confederates now know the Union concentrations; the Union still has not seen the 2nd Brigade.
1100
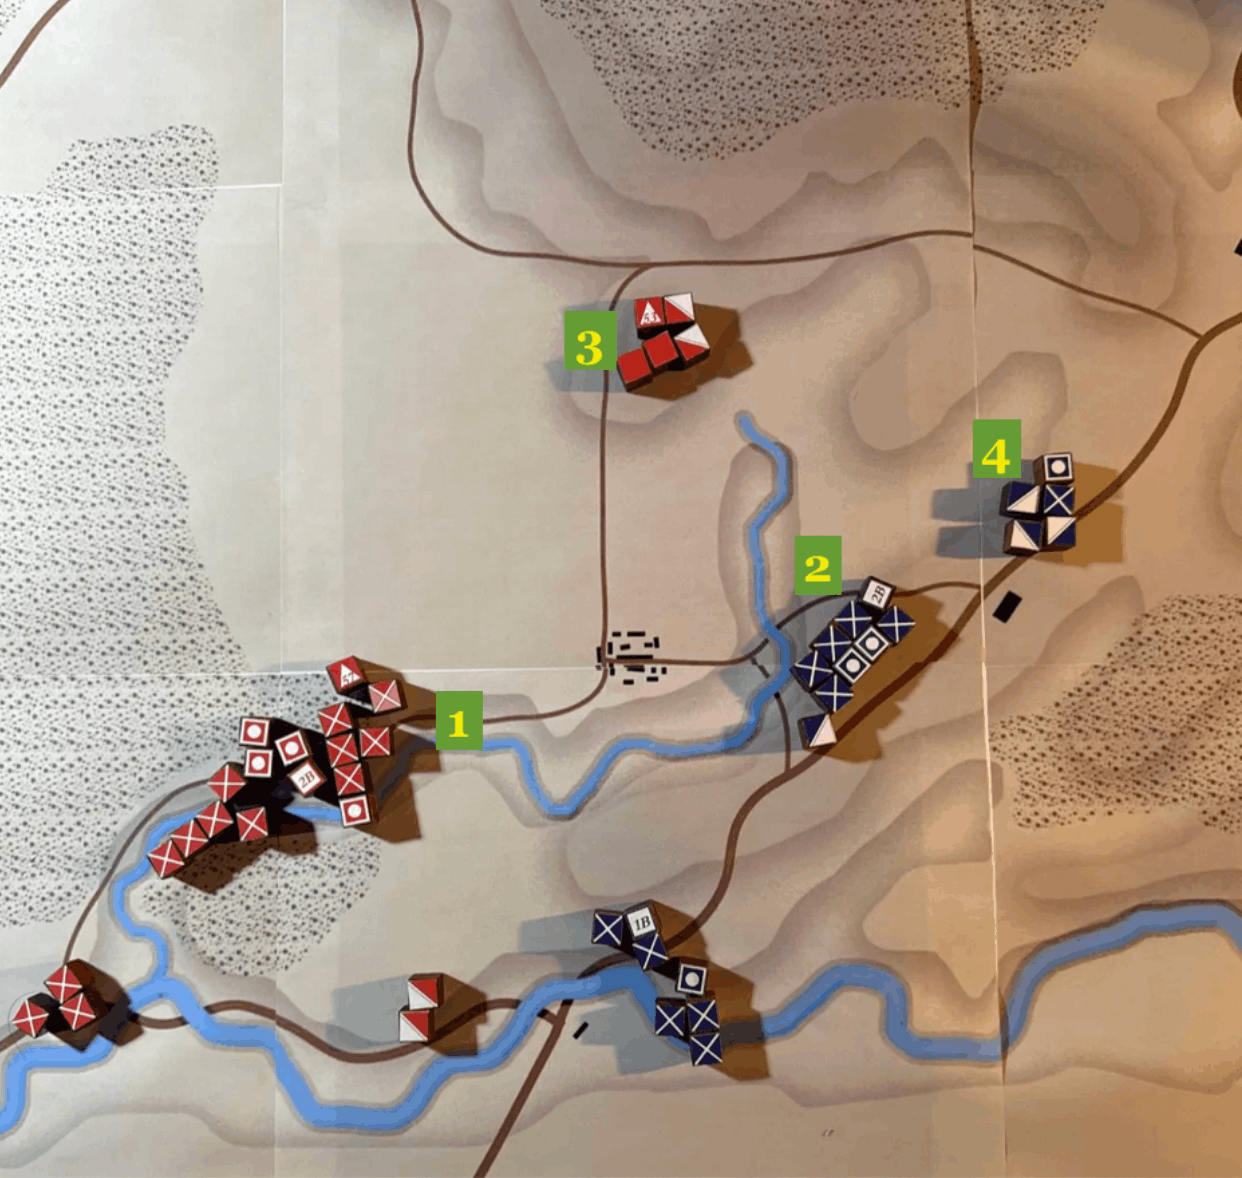
Soldiersteve has started an artillery duel with the Union forces in Leetown and is prepared to assault (1) while August decides to withdraw his 2nd Brigade east to positions behind the river and closer to Telegraph Road (2).
The Confederate cavalry in the north spots the Union cavalry (3). August has maneuvered well, keeping the Telegraph Road and his line of supply secured. He still has earthworks in the south to protect that position. His cavalry can react in the north (4).
1200
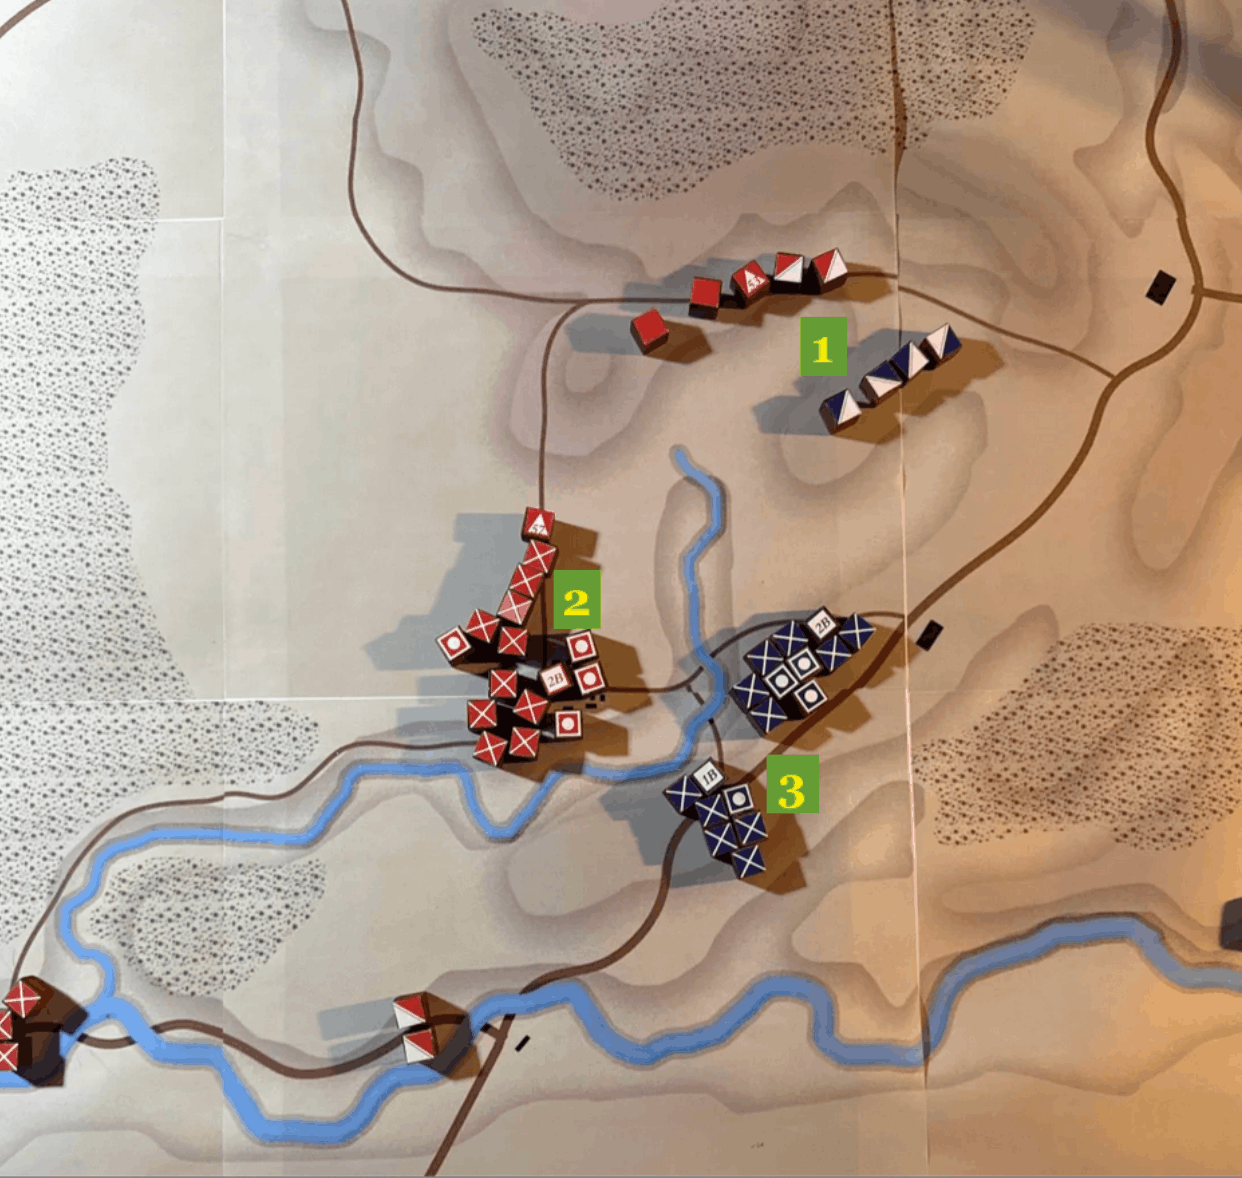
Soldiersteve sends his cavalry east to the Elkhorn Tavern, but they are intercepted by the Union Cavalry guarding that flank (1). August scores a victory as his cavalry drives the enemy squadrons back.
The Confederate infantry moves into Leetown (2), positioning the artillery for further assault. August, wanting to ensure the 1st and 2nd Brigades can support each other, pulls the 1st Brigade back to positions on the ridge near the 2nd Brigade (3).
The Union position remains strong as August has continued to protect his line of supply. The Confederates maintain their ability to concentrate.
1300
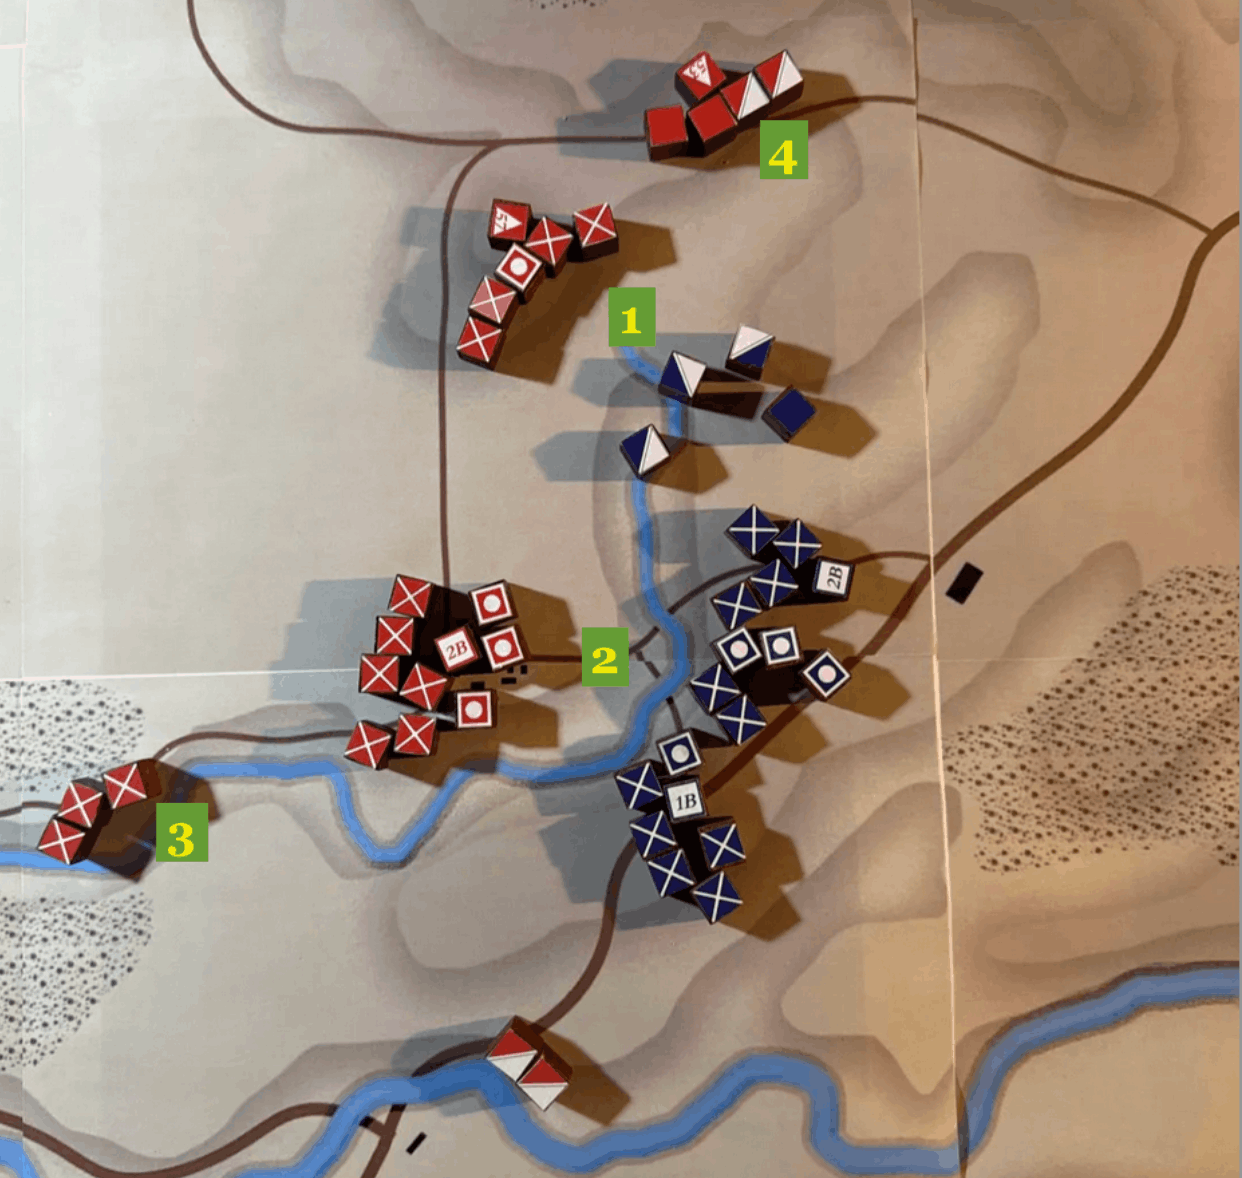
August sends this cavalry southwest at the precise moment that Soldiersteve moves his 1st Brigades infantry force north to the ridgeline (1). The infantry sets up and hammers the Union cavalry. The Union cavalry force is disrupted.
An artillery duel commences, with guns being knocked out on both sides (2). The Confederates continue to position units to conduct a grand assault, pulling up the additional regiments (3) and rallying its cavalry in the north (4).
August’s decision to attack with his cavalry has ramifications for the remainder of the scenario.
1400
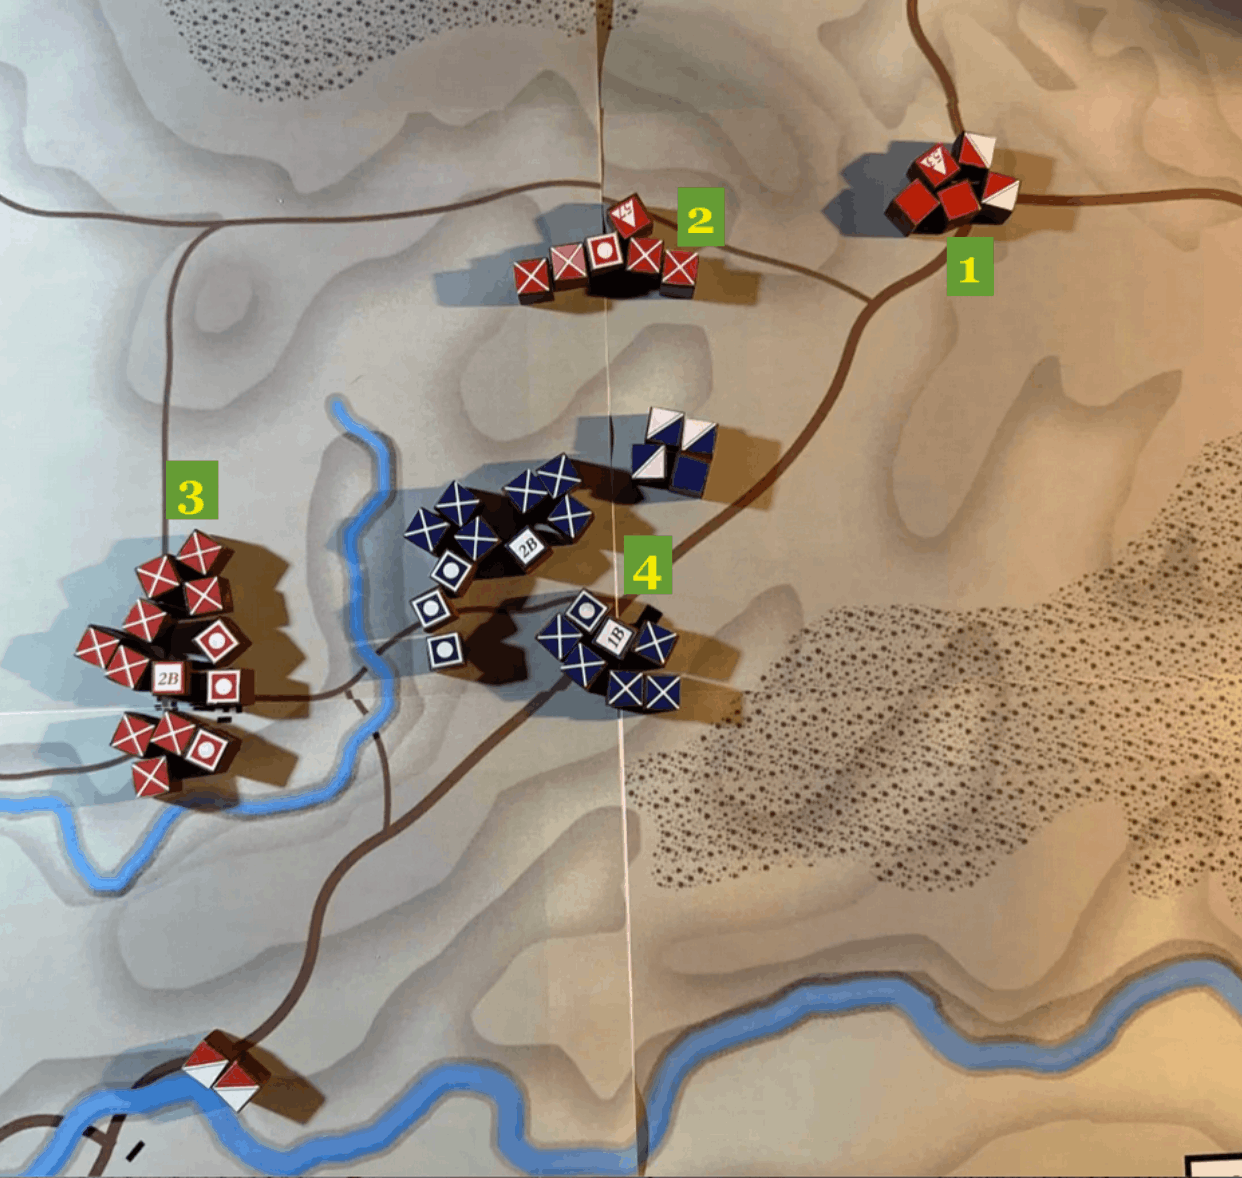
Soldiersteve sends his cavalry east to Elkhorn Tavern which interrupts the Union line of Supply (1). The infantry positions east to better attack the Union flank along the road (2). The 2nd Brigade is now concentrated in Leetown (3).
August pulls his 1st Brigade back further to consolidate his entire force (4). The unsuccessful cavalry attack puts the advantage on the side of the Confederates. Though their cavalry force cannot hold the Elkhorn Tavern from a concerted Union attack, the fact that the line of supply is cut complicates the situation for August.
1500
August, concerned about his line of supply, orders his two Brigades to march on Elkhorn Tavern at the same time that Soldiersteve orders an all out assault on the Union force. The Union soldiers, with artillery limbered and assembled in march column, are hit from the southeast and north. Skirmishers and security are not enough.
The Union position collapses many soldiers fight bravely until they are made prisoner. It is a Confederate victory. The Union has lost 1800 soldiers to injury and death while 2300 were made prisoner. The Confederates lost 1600 soldiers and held the field. Van Dorn is heralded as the Wizard of the West, and Arkansas is secured for the Confederacy.
Historical Outcome
This scenario is based on the Battle of Pea Ridge. Historically, the Union Commander, Curtis, knew he was outnumbered and dug in along the junction of the Little Sugar Creek and the Telegraph Road. The Confederate Commander, Van Dorn, planned to bypass these works and split his force in two, concentrating at the Elkhorn Tavern which would cut the Union line of retreat.
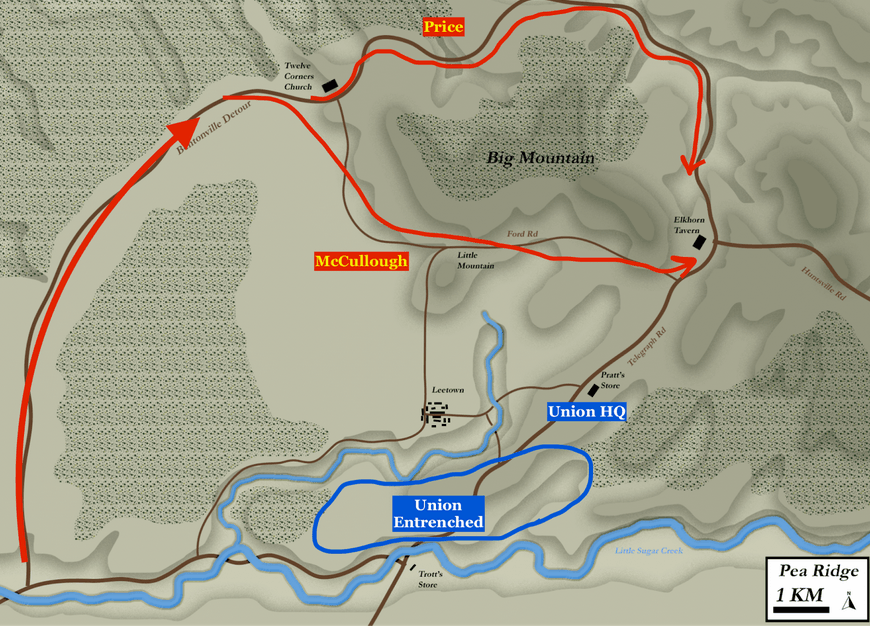
On March 7th, the initial Confederate movements went as planned.
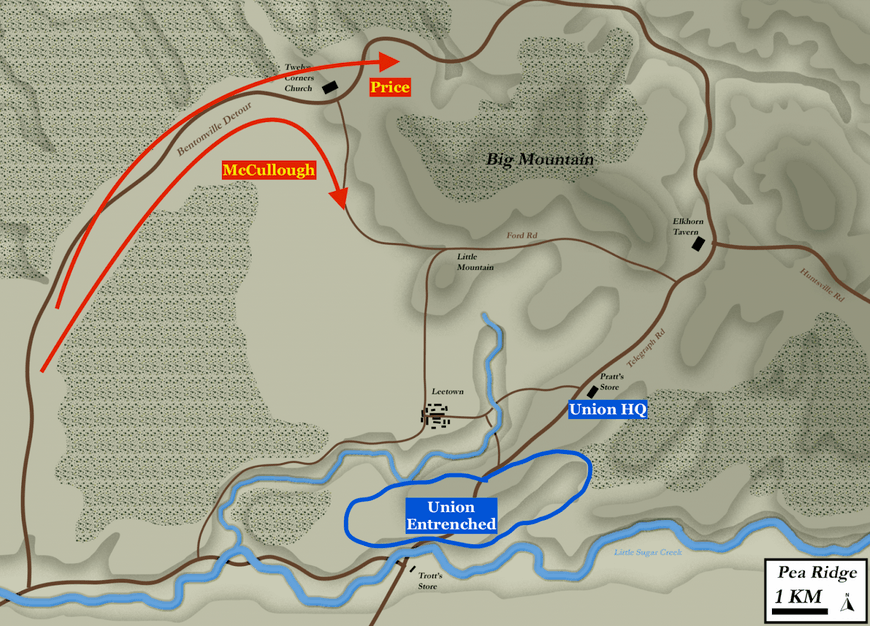
However, Curtis ordered his units north of Leetown to intercept the enemy and a battle took place just north of town. The Confederates had two Generals killed and there was command confusion, and they retreated after taking more casualties than they expected.
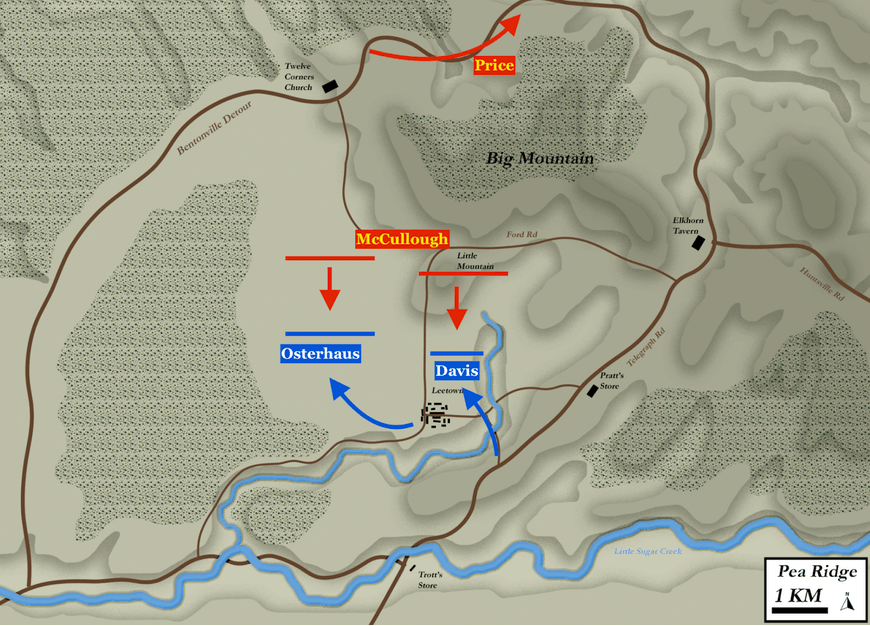
On March 8th, the remaining Confederate force tried to move into line southwest of Elkhorn Tavern. Union General Curtis kept his nerve, maneuvered east and defeated this force using advantageous ground, artillery and a well timed attack.
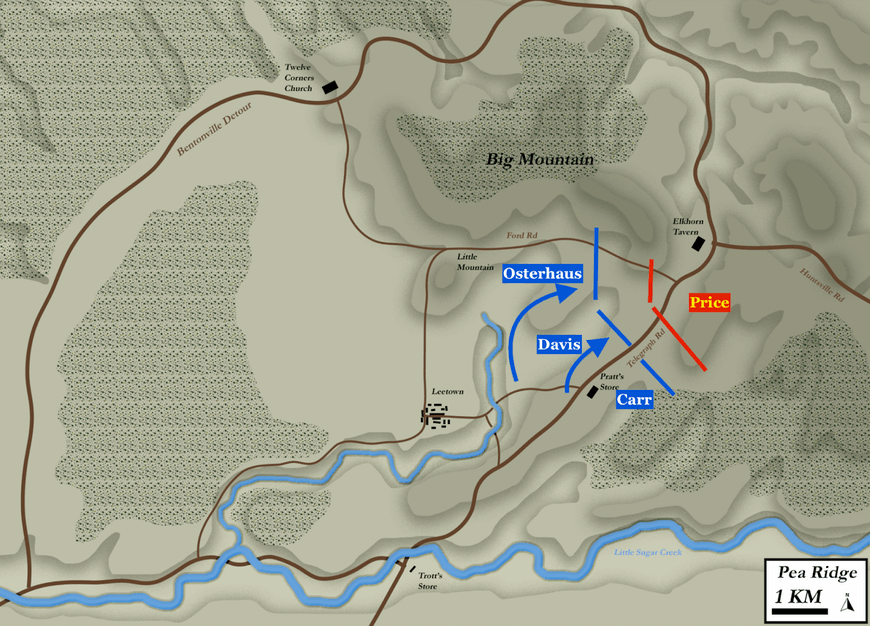
The Union forces had defeated the Confederates in detail, taking advantage of the split in the Confederate forces. Curtis was steady in command, and his brigade commanders executed well. The unlucky loss of several senior officers and the exhausting attempt to march while out of supply contributed greatly to the Confederate defeat. Arkansas and Missouri were secured for the Union, and the emphasis of the western theater after this battle shifted to Tennessee.
Conclusion
This game is proof that even the smallest of games can provide lessons and enjoyment. We agreed that multiple players per side would have increased the command confusion and enhanced the experience. The goal now is to grow the player base of those who have physical sets and can join.
This is another of a series of Kriegsspiel AARs very similar to the events in our Wargame HQ at the Origins Game Fair. You can find the original article here.
August shared that his Napoleonic instincts did not serve him will with his order to send in the cavalry. Soldiersteve commented that he had considered using the northern route that the historical Van Dorn has used, but thought he could not get his forces around that route in time to be effective. Would the historical Van Dorn had had that insight. To this day we all might be speaking Confederate.
Hats off to August for stepping up when he had only played in other other Kriegsspiel scenario and was printing his map off at the last minute. He did not have pieces and was using die for his units:
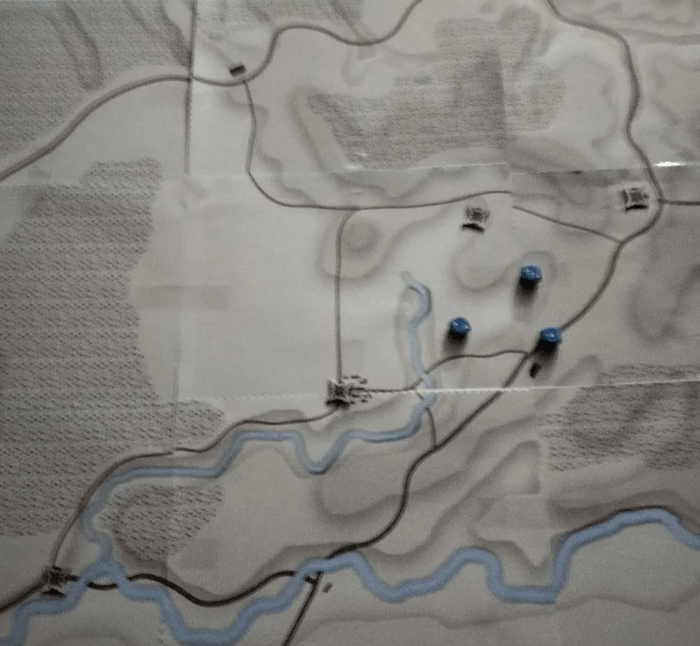
And that worked just fine!
The eight minute turns are a direct result of not having multiple people per command team. It eliminates the work of dispatches. Five players would have expanded this game to 10 minutes turns and a full two hours of play. More learned, more progress. We’ll work on flash markers to show combat for the next game.
We’ll see you out there.
If you’d like to join one of Kriegsspiels you can pop into this part of our forum for more
and you can also find out about the International Krieggspiel Society here
Thank you for visiting the Regiment of Strategy Gaming and riding with The Armchair Dragoons.
Rather than list a bunch of social media links, the easiest thing to do is to check out our LinkTree, which connects you to all of our various locales around the web.
You can also support The Armchair Dragoons through our Patreon, and find us at a variety of conventions and other events.
Feel free to talk back to us either in our discussion forum, or in the comments below.


