
 by
by Bill Simoni, 23 February 2026
The latest COIN bot from GMT is Calixto for Cuba Libre. Instead of the flowcharts that originally came with the game, this expansion purports to be usable, clear, and simple. Does Calixto hit that mark? How does it play? Are the flowcharts really that bad? Is this just a new way to achieve the same result? Let’s dive in.
First off – what, or rather, who, is Calixto? Calixto Garcia was a significant general in the original fight for Cuban independence from Spain in the 19th century. That makes him an apt figure to name the bot after as he ties quite nicely into the overarching theme of Cuba Libre.
What’s Included?
The game comes with:
- a 20-page rules and reference booklet – the rules take up just under 10 pages, the rest being examples of play and designer notes
- a 4-page player aid – how to select the non-player (NP) event/operation, the spaces to complete the action, and how to move pieces
- a 2-sided player aid – details on how to decide if an event for a NP faction will be effective and how to implement each event for a faction, if needed.
- a 2-sided player aid – one side reminds you about the overarching guidelines of running a NP faction; the other side walks through how the propaganda round is handled by the NP factions.
- a deck of 6 cards for each of the 4 factions

Using the Bot
The Calixto bots can be used for any and all of the NP factions. A deck is composed of all the in-play NP faction cards shuffled together. They are always kept face up.
NP factions under Calixto do not get any resources (except for the Syndicate, since that is their victory condition). Unlike the original non-player system, the bot factions do not get to substitute operations + special action instead of a limited operation.
The game proceeds as normal. Whenever a NP faction is eligible, you use a short table to decide whether they select an operation or event. For example, in this below image, the Directorio is eligible and is the first faction on this card. The eligibility table tells you to see if this event is a “critical event” for the Directorio. A separate player aid (not shown for this particular event but see above to get the gist) lists every event and whether or not it is critical for each faction, if it is possibly played if acting 2nd, or if the NP will never play it.
Looking back to the Directorio card, it is a critical event for the Directorio with an asterisk, meaning we need to look for further instruction. The player aid with the clarifications (shown below) indicates that it is only a critical event if they have a base available. Assuming they do, the Directorio will play the event.

One interesting thing about these bots is that they look both at what their opponents can do this turn and at the face-up event card for next turn. If the next eligible faction (player or NP) could play the current card as a critical event, the bot instead plays a limited operation to block its usage. If not, you look ahead to the next card that has been revealed for next turn. If that next event is critical for them (and they will be 1st eligible), the NP will actually pass so they can play that event next turn.
If the event isn’t chosen, then you need to figure out which operation (and a special activity, perhaps) will be chosen. This is where the decks of cards come in. Keeping the order of the cards the same, move one (or more) cards to the bottom of the deck until you have a new card for the eligible faction. Then you follow the steps on the card to determine what the NP faction does. In the below example, if there is larger province without Government control and significant damage can be done to an insurgent faction, then it tells you how to implement the special activity (if allowed) followed by an assault. If the original conditions aren’t met, you either select a new card or flip this card over to proceed instead. After completing the turn for the NP, leave this card on top of the deck. This prevents wandering eyes from potentially seeing what the next NP player may do.
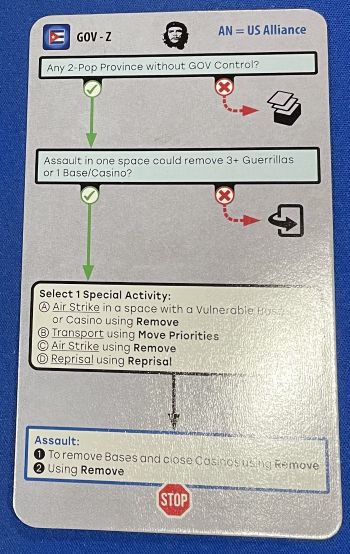
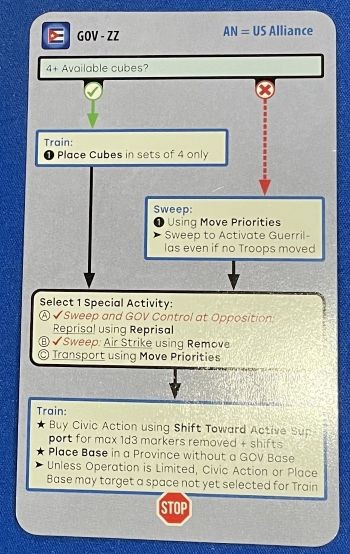
When a bot is doing a full operation, you have to determine how many other spaces they will use. Since the NPs generally don’t have resources, how is that done? On the top left of every bot card there is a number (either on an image of a die or the US Alliance value for the Government). After you complete the operation on the original space, roll a die – beat that number and the bot expands the operation to a second space. Keep implementing and rolling until the bot fails the roll.
When implementing, you often have to decide where the activity will occur. Each faction has a priority list to work through. Simply find the correct action column (usually bolded on the bot card), then work your way down wherever there is a dot. If multiple spaces meet that criteria, break the tie by continuing to go down the priorities until the tie is broken.

Sometimes you also need to select which pieces to move and how many. These charts took me quite a while to get comfortable with. The process is broken down into two steps – which pieces to leave behind and which, if any, of the other pieces to actually move.

Finally, NP factions in propaganda rounds are given instruction on how to perform their steps, such as how to perform Civic Actions and Redeployments.
AAR and Comparison to the Flowcharts
I fired up a solo game with me taking the 26Jul – I wanted to see if the bot could play the Government better than I ever do, the Directorio can be boring, and I wanted to see how the bot played the Syndicate. Flipping over the first two cards revealed the first propaganda card in the #2 slot. OK – it’s going to be one of these games. The NP Directorio gets to play an event (as seen near the top of this article), then I was able to get some more pieces on the board.

During the next stage, the Directorio was able to get another base out and have some prospects of control elsewhere. The Syndicate was establishing casinos but wasn’t getting their guerillas out there for the needed cash infusion. The Government was doing just enough to keep me bottled up with limited prospects. So far, the bots were making moves that looked good and felt effective to me.

The next round felt pretty short. In fact, the propaganda deck was in the deck at exactly halfway point. The Directorio has all its forces on the board (ignore the scoring track – they are only 1 point shy of ending the game now, not 2). The Government and I are still sparring in Oriente, but I keep throwing good actions after negligible results there.
I knew the final round would be anywhere between 12 and 24 cards long.

Well, the final propaganda card was the final card in the deck, so this round lasted the maximum of 24 cards. The board had degenerated into stalemates in most places, with no events shaking up the board state. The Directorio held on to all the territory they already had, so even though they fell one point short of their victory condition, they were the best performing faction in the game.

Re-run But With the Flowcharts
I ended up having a few extra free days before press time, so I kept the deck in exactly the same order and replayed the game. The only difference was I used the original flowcharts to play. I was a little surprised at how differently the game unfolded. I’m skipping straight to the 2nd propaganda card since with the first one being card #2 of the game, it’s essentially the same as the starting positions. The Directorio ignored the other provinces and made a play for Camagüey while I pushed into Santiago de Cuba. The Syndicate got lots of casinos and guerillas out there, moved cash to an Economic Center and made bank; the big question will be if we can drain that before the next propaganda card. The Government was, as in real history, pretty useless.

Nobody could reduce the Syndicate’s resources, so they coasted to a fairly easy victory at the 3rd propaganda round. Quite a different board state than when using the Calixto bot.

Verdict
All in all, the Calixto bot is absolutely usable, but the large charts for selecting spaces and piece movement had me concerned. However, once I got into the flow, it felt like it was getting easier with experience. I had never found the flowchart method cumbersome, and Calixto really isn’t appreciably simpler or clearer. I don’t say that as a criticism but as a comparison – neither does it feel particularly more difficult or opaque. The game above using Calixto took 3 hours; the flowchart game took 90 minutes. But the latter also ended at the 3rd propaganda round, which due to the deck composition, happened to be…exactly 50% of the way into the game. It’s only one sample point, but this one comes out as a draw.
At the end of the day, you are substituting one flowchart per faction with six. Just looking at the cards shows you they are themselves little flowcharts. The prime benefit of them is that they inject more variety into how the bots operate. With the original flowcharts, since the procedure never varies, an experienced player can tailor their moves to counter the bot. Calixto avoids that and, at least in my opinion, that variety and functionality give it two Cuba Libres up…er…on the rocks.

Thank you for visiting the Regiment of Strategy Gaming and riding with The Armchair Dragoons.
Rather than list a bunch of social media links, the easiest thing to do is to check out our LinkTree, which connects you to all of our various locales around the web.
You can also support The Armchair Dragoons through our Patreon, and find us at a variety of conventions and other events.
Feel free to talk back to us either in our discussion forum, or in the comments below.


