
 by
by Ian Brown, 5 October 2026
I’m something of a paradox when it comes to the American Civil War, and wargaming. For most of my life I’ve been immersed in Civil War history. It first came from my father, who in another of life’s little paradoxes was himself deeply interested in Civil War history while being of 100% Canadian stock. I myself grew up in Toronto, which made the contrast between my spring breaks and those of my schoolmates somewhat jarring. My schoolmates got to visit warmer climes like Florida or California and visit amusement parks. If their legs got tired it was from marching around Disney World all day.
As for my family’s spring breaks: year after year until I was well into high school, my father packed us up in the station wagon or minivan and took us to every major and minor Civil War battlefield east of the Mississippi. My legs got tired from marching the fields of Pickett’s Charge or crossing Burnside’s Bridge. The audio guides my father bought to help navigate each battlefield became a running joke in the family as “Peter tapes,” because Peter the narrator was curiously upbeat when describing things like the human wave attacks at Fredericksburg.
But these battlefield visits were certainly formative as they became a subconscious foundation for my decision after college to join the Marine Corps. And as it happened, I got something of a second tour of the Civil War—The Basic School in Quantico, Virginia was close enough to several battlefields that we would use the park roads for our conditioning hikes, and thanks to the generosity of a Marine veteran who lived near Gettysburg we got to camp overnight very close to Culp’s Hill. As I made my way through flight school in Pensacola and New River, I’d carve out time on the weekends to visit the closest Civil War fort.
And when I had my own kids and wound up stationed back near Quantico, I did what any good father does—inflicted the same suffering on my own children that I’d endured myself as a kid.
And when I had my own kids and wound up stationed back near Quantico, I did what any good father does—inflicted the same suffering on my own children that I’d endured myself as a kid. We didn’t get to every battlefield east of the Mississippi, but we damn well visited almost all the battlefields of the eastern theater. Did my kids always enjoy it? Don’t know, never asked. But did they learn something? Well let’s just say that when my eldest had to do a battlefield map for a 7th grade history project, my insistence that he spend the summer before 7th grade visiting every eastern theater battlefield—in chronological order—paid off because he got the highest grade in the class.
Moreover, he not only drew a nice map; he could explain what happened in the battle and why, and that might have come from my further insistence that whenever we got back from a battlefield tour, I’d break out Richard Borg’s Battle Cry and have my son refight whichever patch of dirt we’d just walked.
Yeah, I’m a fun parent.
But despite both a long affinity for Civil War history and an equally long love of wargaming, Civil War wargames never really caught my fancy. When I was younger I played Avalon Hill’s Gettysburg and somehow acquired Victory Games’ The Civil War from one of my father’s battlefield visits, and perhaps it was the latter that first made me wary of many of the entries in Civil War gaming I would later encounter. Yes, it was a big war, and it seemed like many game designs decided they needed to be equally big, the more maps and counters the better. And while I’ve never minded games that demanded wide spans of control or a significant amount of time to play, I also have no affinity for games whose sole purpose seems to be outdoing their predecessors in counter management.
How many times do designers need to recreate Gettysburg? Always once more it seems, but no, this time it’ll be different—we’ll do it at the company level. Or I’ll do you one better, platoon level. That’s adorable—how about squad level and each hex is five meters and each turn is five minutes of battle time so that you can replay July 1-3 in real time? Oh, and somehow you’ve got continent-wide situational awareness of your opponent’s dispositions, so stealing a march or doing a deep cavalry raid never gains you the operational surprise it should, which makes everything drag on that much longer.
I’d rather do Pickett’s Charge for real than play those games.
My point is that I’m extremely selective when it comes to Civil War games. It would take a truly singular design to pique my interest. Which brings us to And The War Came (ATWC), designed by Larry Pinkerton and published by Blue Panther. I interviewed Larry earlier this year about the background and design process of the game, but have been remiss in putting a bow on my actual game review.
It’s time to rectify that omission because ATWC is one of those rare Civil War games that I’d play again, and look forward to doing so.
What’s In The Box?
ATWC is a strategic-level game with scenarios covering parts or all of the conflict from 1861-1865 through seasonal turns. The box includes a paper map, corps-sized unit counters for both the United States Army (USA) and Confederate States Army (CSA), counter covers for all (more on that shortly), modifier and tracking tokens, dice, order/event cards, player aids, army information sheets, general officer tracking sheets, rulebook, and a battle board.

click images to enlarge
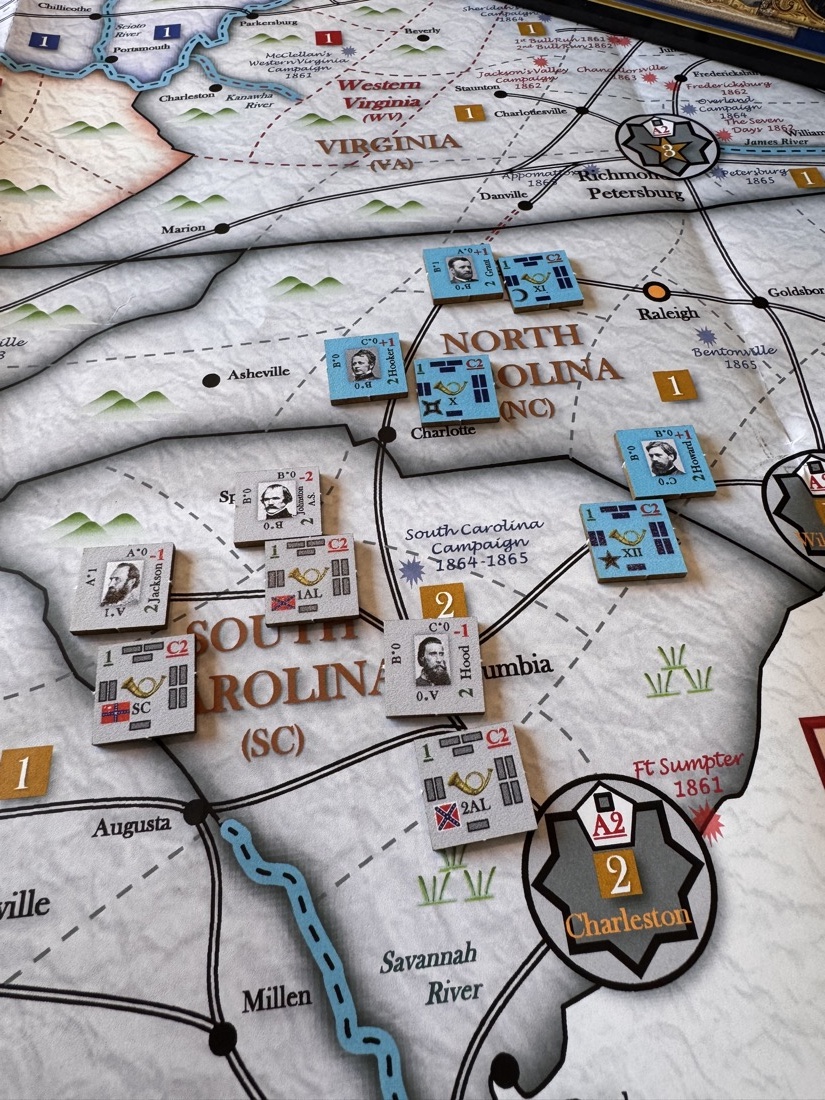
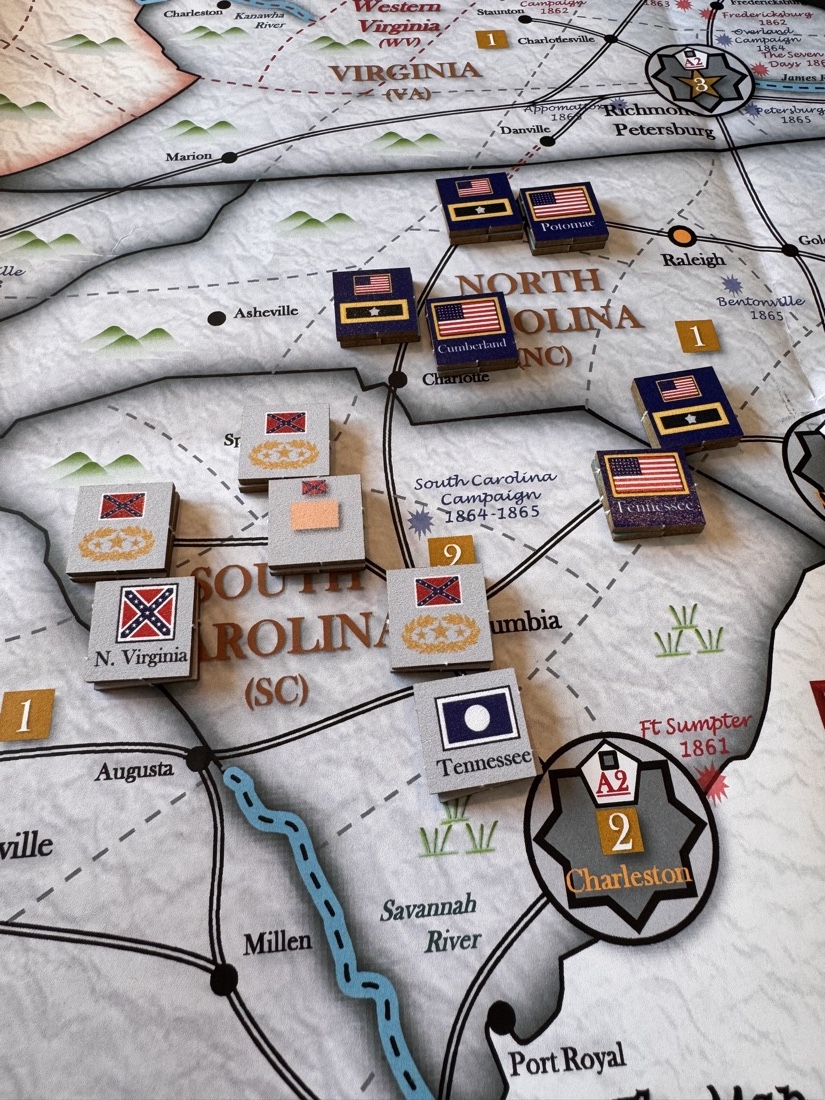
The unit counter covers are one of the aspects of the game that intrigued me when I first learned about it. It’s an effort to leverage the “fog of war” and step count mechanics of Columbia block-style games without the added weight and expense of having hundreds of wooden blocks in the box. Having gone through the publication process of my first commercial game design over the last couple of years, I’ve come to appreciate the considerations between designer, publisher, and customer that give a game its final form. I love the block system but they definitely add…heft to the physical game. Heft drives cost, both cost for the components themselves and then the cost of shipping games to customers. And that cost can be the difference between a game enjoying wide distribution and a game that looks cool but whose price tag makes the gamer think, “damn, it’ll be hard to justify this one to my wife.”
Larry’s approach with counter covers is an elegant solution to that problem, retaining the flavor of the Columbia block system while not pushing the game’s cost into Twilight Imperium territory.
Over by Christmas?
For my review playthrough I chose the first scenario from the rulebook, “Rally ‘Round the Flag.” This covered three game turns—spring, summer, and fall of 1861. ATWC uses victory points derived from controlling key areas of the North, South, or border states. This scenario was all about the victory point differential at the end of three turns. If either side was aggressive and successful enough in rapidly securing key locations, the war could be over by Christmas of 1861 (and if the CSA captures and holds Washington DC for a season, the war ends a lot sooner).
The scenario starts with roughly a dozen infantry corps on both sides already deployed across the map. Most USA forces are on northern territory with several in boxes “off map” to represent recruitment areas far away from the front. CSA forces start dispersed across southern states, which meant that the Confederates need to make immediate and extensive use of their existing railways to keep northern forces from penetrating south too quickly.
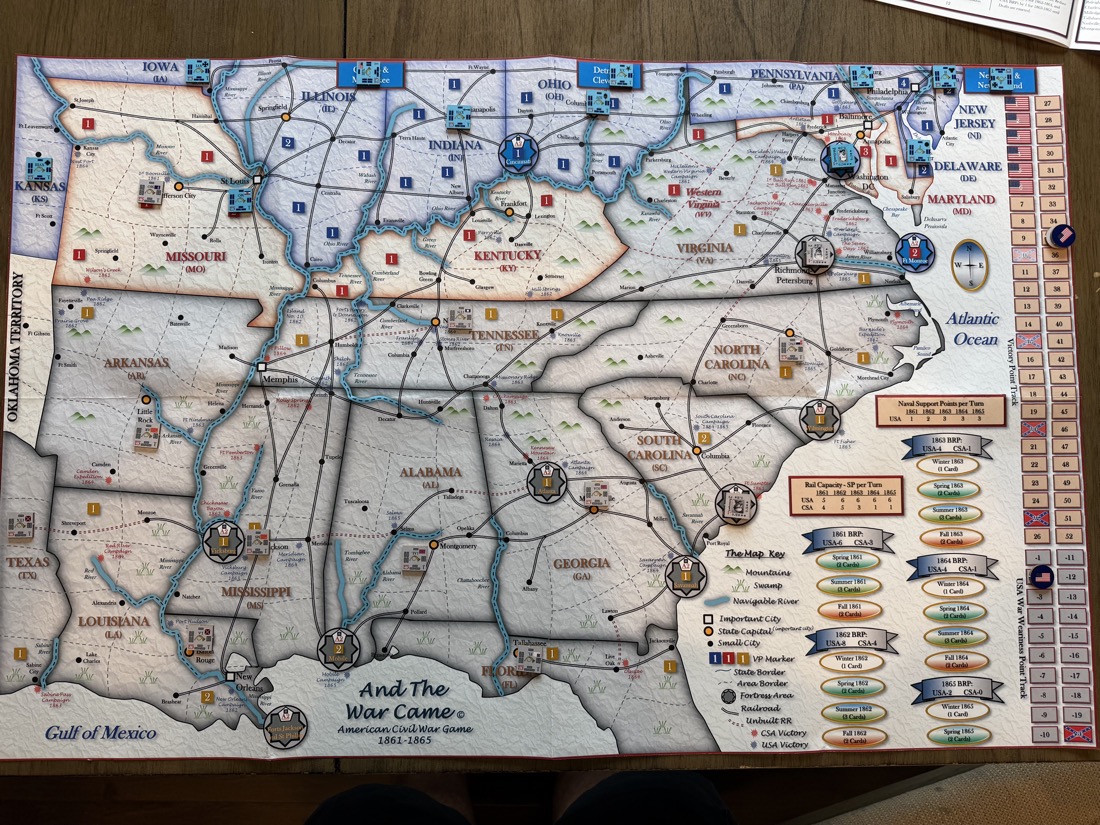
Both sides also start with a corps each in the “border” state of Missouri. Border states have key territory which feed into the victory conditions, and Kentucky has a unique “neutrality” rule to reflect the delicate historical position that state occupied during the war. Its geographic position and resources were desired by both sides but neither wanted to risk pushing into the other’s camp. Thus whichever side first enters Kentucky territory, the other gets to immediately place a friendly infantry unit in the state to represent militia, and the invader suffers a war weariness penalty.
After the initial setup, “Rally ‘Round The Flag” kicks off the turn sequence in Spring, 1861, with a five-step turn:
- Card step
- Administration step
- Operations step with action phases
- Logistics step
- Victory check
In the first step each side is dealt a specific number of orders/events cards based on the season. These cards serve several functions: they dictate the number of orders the player can issue to their units during the operations step, they allow for bonus actions such as combat enhancements or the promotion of generals, and a few include historic events. The order in which they’re played during a turn also determines which side has initiative in movement.

In the Spring turn, both sides get two cards. In this scenario, the USA drew “Event and Three Orders” and “Issue Four Orders,” and the CSA drew “Event and Three Orders” and “Issue Five Orders.” Both sides thus start the scenario with roughly equivalent action capability; how that translates into advantage comes from which cards get played first, as well as what resources the players get in the second step, Administration.
The Administration step grants players resources for recruitment based on what their industrial and manpower levels were in a given year, combined with a die roll to capture the vagaries of fortune. In 1861, the USA gets 6 resource points (RP) each turn, and the CSA 3 RPs. USA rolled a 2 for a total of 8 RP, and the CSA rolls well with a 6 for a total of 9 RP to start the game—guess the fire-eaters went out on recruiting duty. Both sides place units with Strength Points (SPs) equivalent to their RP totals on their respective army information sheets to be placed later in the turn; internally, each side has decided they will use their SPs to strengthen existing corps already on the map.

After recruiting each player assigns any new general officers entering play that season to a corps already on the board. The assignment and employment of generals in ATWC is another of its unique features. As Larry outlines in his interview, there weren’t significant qualitative differences between combat formations of the North and South: both came from the same training and doctrinal backgrounds, both were organized roughly the same, both used similar ordnance and so on. And yet there were differences in battlefield performance, and the game uses qualitative differences in general officer leadership to capture this.
Generals on both sides enter play as a one-star or brigadier general (BG), enabling them to command a single unit or corps initially. As the game progresses, cards allow players to promote generals to two- or three-star rank (or for Grant and Sherman, four-star), and this in turn increases the span of control generals can exercise over multiple corps. Thus, all else being equal, you’d want to promote generals sooner rather than later so that you can concentrate more combat power in one place.
But as Larry has designed things, all is not equal. It’s a matter of historical record that some Civil War generals performed better and better as they rose through the ranks. Others didn’t get better, but at least delivered consistent and stolid performance. And some—especially “political” generals whom both Lincoln and Jefferson had to coddle for domestic reasons—got worse as more stars were pinned on them.
And so the decision on whether to promote a certain general is not nearly as straightforward as it might seem
And so the decision on whether to promote a certain general is not nearly as straightforward as it might seem, and it creates a very interesting meta-layer of strategy in how players must handle their general officers. Promotion always increases a general’s span of control: BGs can only command a single corps, whereas major generals (MG) can command up to two corps and lieutenant generals (LTG)—who command named armies, such as the Army of the Potomac—can command up to seven corps.
But promotion can also alter a general’s initiative—which determines the order in which combat units get to fire during battle—as well as their tactical skill, which increases the chances of a unit under their command inflicting damage during combat. For example, Robert E. Lee has the same initiative and tactical skill as a BG and MG, but increases both attributes when promoted to LTG, making the forces under his command as a three-star highly capable. Jubal Early’s attributes don’t change as he gets promoted, but again there’s something to be said for the consistent, stolid commander who delivers reliable performance regardless of rank.
And then there’s John Bell Hood. As a BG, Hood actually starts off with a very high initiative rating, but then gets progressively worse the higher he gets promoted. This means that, depending on the type of corps he’s commanding, he may actually degrade that corps’ initiative and combat effectiveness, making it less capable than if it were independently led by a no-name one-star. Anyone familiar with Hood’s performance from the Seven Days’ Battles through the Atlanta campaign, the Battle of Franklin, and finally the Battle of Nashville must admit that the way ATWC implements Hood’s command attributes is historically accurate.
So promote Lee as fast as possible, Early when you can, and just keep Hood as a one-star, right? Nope; again, such decisions are not nearly as straightforward as they seem because in ATWC, as in the actual Civil War, generals in the field are exposed to the dangers of any combat they partake in and can be wounded, killed, or even captured. Say history plays out differently: Lee takes a bullet between the eyes during the Seven Days’ Battles, Early is severely wounded and out of action for a year, and the CSA still needs someone of sufficiently high rank to command a large number of forces in the field. Hood may be a lousy three-star but may be the only choice to effectively concentrate CSA forces where they’re needed.
and this is where the unique effect of “political” generals is again felt
A final wrinkle with general officers is the ability to demote LTGs if necessary to make room for a more capable senior commander overseeing a named army, and this is where the unique effect of “political” generals is again felt. There’s always a small penalty to war weariness for demoting a senior leader, which reflects the public’s frustration that something in the war must not be going well for a three-star to get fired. But someone like Irving McDowell is just one of many obscure career Army officers with no constituency beyond the other Army friends he’s made along the way—demote him and the public will soon forget. George McClellan, on the other hand, who made a point of building up his own political constituency while occasionally pointing troops in the general direction of the enemy? Firing him will cause domestic blowback, so you better be postured to achieve some quick victories in the field or the war weariness penalty could prove disastrous.
In Spring 1861, the USA gets generals Fremont, Lyon, and McClellan. I deployed Fremont to the infantry corps in St Louis, MO, McClellan to Columbus, OH, and Lyon to Dover, DE. The CSA received A.S. Johnston, whom I placed in Jackson, MS. Playing solo it wasn’t like I could keep each side’s strategy secret from the other, so I decided both would follow the plausible and historically defensible plan of capturing each other’s capital as a primary goal to force a rapid end to the war. The North’s secondary goal would be putting pressure on the weakly defended western CSA states, while the South’s secondary goal would be holding a good defensive line in the west and looking for opportunity to threaten Northern states and increase the North’s war weariness.
This took us to the Operations step in the turn, where movement and combat occurs. The USA and CSA revealed their cards; both opted for their highest numbered cards, and so the CSA gained initiative this turn since “Issue Five Orders” has value of 5 and the USA’s “Issue Four Orders” has value of 4. The Confederates move first.
The game map is largely an area movement map, with infantry movement within a single season reasonably constrained to one to two areas based on the quality of their assigned general. Of course, in the Civil War railroads played a significant role in strategic mobility for both sides, and so long-range point-to-point movement is also an option depending on which rail lines a side controls (there is also a fun, and realistic, option for destroying and repairing railroads when moving through enemy territory). To reflect Northern naval supremacy, the USA can also use rivers for point-to-point movement, and ocean zones for area movement.
The CSA first moved Johnston’s Corps via rail to Madison, AR, then made an additional move to Batesville to reinforce the western Confederacy. The 1 TX Corps moved to Shreveport, LA; LA Corps moved to New Orleans to prepare for later movement by rail; 1 AL Corps moved by rail to Madison; 1 NC Corps moved by rail from Raleigh, NC, to Manassas Junction to screen Richmond from Northern advances. The CSA side also used their order card’s ability to increase the combat class of the 1 NC Corps by one level for this action phase. There’s no combat shaping up (yet) but the CSA is its positioning forces to execute its strategy.
Then the North executed its movements. It first moved the XVIII Corps from Lawrence, KS, to Jefferson City, MO, using the card text from “Issue Four Orders” to increase the Corps’ movement allowance by one. The USA then moved Fremont’s Corps from St Louis to Jefferson City as well in an effort to eliminate the CSA presence there. This means our first battle is coming up! The North’s final moves shifted the XIII Corps from Chicago/Milwaukee to Rolla, MO, and then shifted McDowell’s Corps from Washington DC to Manassas Junction to set up a second battle.

So the war opens with the fight for Jefferson City. It’s two USA corps against one CSA corps, but because Fremont moved into the area second he comes in as reinforcements, which means he’ll only engage in a second round of combat if the CSA player stays and fights after the first round.
For combat, players transfer the engaged unit to the battle board, which includes columns for where units are placed based on their combat rating (A, B, or C) and rows for those units engaged in the first round of combat and those which are reinforcements that can participate in the second round. Combat is only one round for uncommanded corps, whereas generals can force a second round of combat. Units cause a “hit” which equates to a step count loss based on their combat rating (for example, a C2 unit would cause a hit on a 1 or 2 die roll). This is another area where generals matter—they can elevate the combat rating of units under their command, expanding the window for what die roll number causes a hit.
As the defender, the CSA fires first, rolling 1 die for a 6 which causes no hits. The USA corps fires back rolling a 4, which also misses. Now Fremont’s corps comes into play as the reinforcements—but he also rolls high and misses. The CSA players opts to retreat to Springfield, MO, to preserve its force and allow other CSA corps to join it later on. This means that the USA has captured Jefferson City, and will get 1 VP at the end of the turn (assuming it still retains control).
Now on to the second battle which takes place at Manassas Junction (for my playthrough—as was the case historically—Manassas got fought over a lot). It’s McDowell’s Corps facing 1 NC Corps. As a BG, McDowell doesn’t add any tactical benefits to his corps other than allowing two rounds of combat. As the defender, 1 NC rolls first with a 5, causing no hits; the order card modifier didn’t matter. McDowell’s Corps rolls a 6, also causing no hits. McDowell wants to fight a second round but again rolls and misses. At this point, the CSA opts to withdraw 1 NC, again to preserve it for future use, and shifts south to Fredericksburg.
That completed all the actions for the first card played in the Operations step. Since it’s spring, both sides get to play a second orders/event card; both sides can issue three orders, so we’ll stay with the CSA having the initiative. The CSA player moves the 1 TX Corps to Monroe, LA; Beauregard’s Corps moves by rail from Charleston to Fredericksburg, and finally 1 AL Corps moves from Madison, AR, to Ironton, MO.
For the North, McDowell’s Corps moves back to DC, the XIII Corps moves from Rolla, MO to Ironton—setting up another battle—and the V Corps from New York/New England moves by rail to Manassas Junction.
Time to battle for Ironton. This is the first time one of the combatants has more than 1 SP assigned to the corps; the XIII Corps has 2 SP, so it will get to roll two dice assuming it takes no damage in the first round. As the defender, the CSA rolls first and gets a 6; miss. XIII Corps rolls a 2 and a 3; finally, we have a battle with casualties. The CSA’s corps is entirely destroyed.
This completed the Operations step for Spring 1861, so now we move to the Logistics step. Neither side has done anything to interfere with the others’ supply lines, so all units on the board remain in supply. This takes us to placing recruited units, and recall we said both sides were going to use their RPs to reinforce units already on the map. The CSA has 9 RP and the USA 8; the CSA decides to push 4 SP to reinforce 1 NC and Beauregard’s Corps in Fredericksburg, 2 SP to reinforce Johnston’s Corps in Batesville, 2 SP to reinforce MO Corps in Springfield, and the last SP to Johnston in Richmond. The USA player sends 1 SP to the V Corps in Manassas, 3 to McDowell in DC, 2 to XIII Corps in Ironton, and 2 to Fremont’s Corps.
The last step checks the victory conditions for both players. With few maneuver elements in the field and only a few battles, neither side has done much to swing the calculus. The USA player gained a victory point for securing Jefferson City, but its war weariness remains low at -2, so we’re still very far away from the victory point differential required to win in this scenario.
”Rally ‘Round The Flag” continues through the fall of 1861 but I won’t belabor each turn sequence here, just give the highlights. Summer 1861 was bloody for both sides, with heavy fighting in the west for Springfield and two more battles at Manassas Junction (history doesn’t repeat itself but it does rhyme). With both sides receiving new generals in the Administration step, this increased the possibility that generals might be wounded or killed on the battlefield. That’s exactly what happened at the Third Battle of Manassas, where the CSA lost Beauregard killed outright on the field of battle, and the USA lost McDowell and Banks to wounds for multiple turns.
As it happened, during the summer turn the CSA also recruited its first cavalry units, and in Fall 1861 saw an opportunity for some deep penetration into Northern territory while the USA built up more forces in DC. Thanks to a bridging bonus on one of its orders/event cards, the CSA launched its cavalry up through border state areas in western Virginia and pushed all the way to an undefended Philadelphia, grabbing a number of Northern victory points on the way. The USA player shifted units north to push the Confederate cavalry back out of the City of Brotherly Love but the CSA retrained control of border state areas and chunks of Pennsylvania. Meanwhile, hard but inconclusive fighting out west saw little territory change hands; however, the CSA had BG Hardee captured after an engagement when the infantry he commanded were destroyed.
Despite the relative brevity of the scenario, the lightning thrust of Rebel cavalry into the North garnered the CSA enough victory points to close the differential and meet the conditions for a Confederate win. In this part of the multiverse, at least, the war was indeed over by Christmas.

Closing Thoughts
I like ATWC a lot. In its handling of national resources, inter-theater mobility using railroads and rivers, and considerations of war weariness and firing “political” generals, the game feels appropriately “strategic” for a conflict that covered a continent. Meanwhile, the command attributes of the general officers make the battles tactically intimate and more nail-biting than one would expect from having abstracted infantry corps banging against each other. Indeed it’s surprising how agonizing having a general wounded or killed hits you in the game’s framework, especially after you’ve gone to the effort of promoting them—it reminded me of those moments from X-COM when you’ve watched a squad member grow, gain experience, become a vital part of your plan, only to watch them die because you put them out front one time too many. There aren’t many games that effectively combine the sweeping grandeur of strategy with the knuckle fight of tactics, but ATWC is one of them.
Indeed there is so much good in this game that I feel like my criticisms are quibbles, and I don’t have many to offer. The one thing I did find would benefit from a revision was the rulebook. It’s not a bad rulebook at all, it’s a solid one, but in a game where the specific sequencing of things matters—and this was especially true in resolving combat, with the various conditions and sub-conditions of different ranks of generals controlling differing corps with a large army—some visual guides that illustrate the sequencing flow would be a significant boon to player understanding. As Larry makes clear in our interview and in the forums on Board Game Geek for his game, the interplay of leaders in combat is arguably the game’s engine. Players need to ensure they’re getting that interplay right, and some clarifying documentation would help. And it seems clear Larry understands this, as he’s been very active answering rules questions on the game’s BGG forum and it sounds like a revised ruleset or FAQ is in the works.
So ATWC gets my highest endorsement: I want to play it again, and it makes the (very) short list of Civil War games that will actually hit my table more than once. I want to play it again because it was fun, and because it feels like there are still lots of intriguing player decisions waiting beneath the surface. It strikes the balance that I love to see in a wargame, especially a wargame one might consider using as an introduction to the genre: using a modest number of components—just a few dozen unit counters on each side, and a stack of cards smaller than a poker deck—it nevertheless presents players with rich and challenging decisions inside the game.
If there’s life yet in the Civil War game genre, it will come from games like And The War Came. Now, on to Richmond!
You can chat about this game in the Age of Gunpowder section of our discussion forums
Thank you for visiting the Regiment of Strategy Gaming and riding with The Armchair Dragoons.
Rather than list a bunch of social media links, the easiest thing to do is to check out our LinkTree, which connects you to all of our various locales around the web.
You can also support The Armchair Dragoons through our Patreon, and find us at a variety of conventions and other events.
Feel free to talk back to us either in our discussion forum, or in the comments below.


Great review Ian! I’ve got to get this on the table, just to try out these mechanics.
BEST QUOTE OF THE YEAR – “I’d rather do Pickett’s Charge for real than play those games.” in reference to yet another Gettysburg game 🙂
Hood had initiative as a higher level general.
Attack!
Attack!
Attack!
Lack of initiative was not his weakness